Click: The Warmth of Metal

| 18 comments
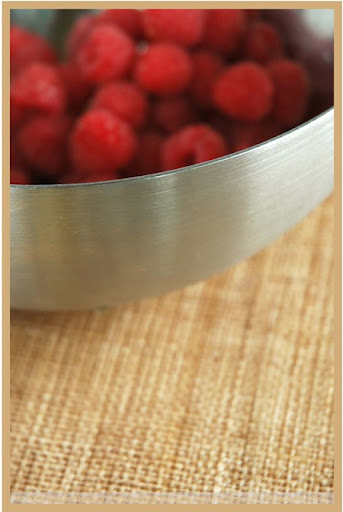
Raspberries Metal (062) by MeetaK

I hope I am in time for Click! Probably in the nick of time. But I cannot miss it. I had taken a few shots before I left Germany for Dubai and was rather pleased with all of them. But I decided to select this one for my entry to Click - Metal, which is the current theme.

Metal is a rather cold material. I wanted to portray it in a warm light. Not easy but achievable with the right lighting, colors and backdrops. I have a wonderful matt metal bowl, that I love and it was perfect for this shot. Food had to be a part of the shot. After all food is what this blog is all about. I used some fresh raspberries as I love the warm, pink and red shades, which is always eye-catching. My background is a soothing burlap placemat. These colors reflect against the metal and create a wonderful effect.

Details

  • Camera: Nikon D70s
  • Lens: Nikkor 18-70mm
  • Tripod: Bilora 1211
  • Focal Length: 70 mm
  • Exposure Time: 1/30s
  • Aperture: f/4.5

Important Note: For those of you who come on over to What's For Lunch, Honey? from Taste of India, there seems to be a little hitch there. For some reason TOI is not updating certain feeds and unfortunately my blog is also effected. Sailu is trying to fix the bug, in the meantime if you would like to keep yourself updated with the posts here, you can subscribe to WFLH using another service. Check my sidebar and select your favorite subscribing service.

Now time for me to get back to my shopping - after all I am in the shopping paradise of Dubai!

Ciao!


All photographs and written content on What's For Lunch, Honey? © 2006-2008 Meeta Khurana unless otherwise indicated. | All rights reserved | Please Ask First

18 comments Continue »

The Perfect Party Cake

| 82 comments

Daring Bakers Challenge March 2008 - Perfectly Dorie

 Perfect Party Cake (10) by MeetaK


No voodoo dances this month, as I did last month! This month our lovely hostess Morven of Food, Art and Random Thoughts chose something that made me jump and do a dance of joy. Morven said she wanted to pick something that had potential for putting our own personal stamp on it. I love that. It's easy creating something from from a cookbook, but adding one's own personal touch, a little something that says "I made it!" is special.

Morven's choice fell on Dorie Greenspan's The Perfect Party Cake from her simply awesome book Baking: From My Home To Yours. For those who do not have this book, and I believe there might only be a few handful out there, please do. Dorie's recipes are easy, fun and simply delectable. There has not been one recipe in this book that I did not like.

Another thing I loved about the challenge is that Morven left us plenty of room to be creative. The idea was to stay true to the basic cake recipe and the basic buttercream recipe (for those using buttercream) and see what combinations we came up with.

The truth is, I normally do not make these kind of cakes. So, when I read the recipe and saw the picture in the book I thought I would stay true to the entire recipe, and in Dorie's section "Playing Around" she suggested using fresh raspberries in between the layers. I loved the idea. The only change I made was in the size. I had just received some stainless steel cooking rings and was dying to use them. And that is exactly what I did.

I followed the recipe exactly then simply cut the cake using the rings and layered the fruit, jam and buttercream in the rings. I also did not cover the entire mini-cakes with the frosting. I liked the way the layers looked so I smothered the last layer with a bit of buttercream and the coconut. I still need a bit of practice using the rings, but I think my first attempt was quite good.

I made the cake the same week it was announced as I knew I would have a tight schedule this month. I am in Dubai now and my parents were drooling over this last night when I was working on the pictures. I think they want me to make this for them now!!!

As I said earlier, Dorie's recipes are easy to follow and I have not experienced any difficulties with here recipes. Even with this cake - it looks spectacular and the steps are so easy to follow, the cake is fantastic to handle - robust even after all the handling I did and the buttercream was a breeze to make. Somehow when I am in the kitchen with Dorie I feel so confident, I know I cannot falter.


The Perfect Party Cake
(adapted from Dorie Greenspan's Baking: From My Home To Yours)

Printable version of recipe here.
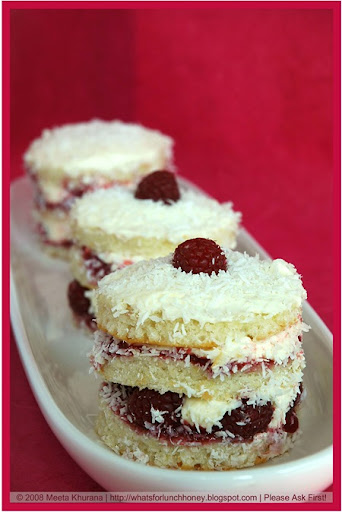
 

Perfect Party Cake (07) by MeetaK

For the Cake
2 1/4 cups cake flour
1 tablespoon baking powder
½ teaspoon salt
1 ¼ cups whole milk or buttermilk (I prefer buttermilk with the lemon)
4 large egg whites
1 ½ cups sugar
2 teaspoons grated lemon zest
1 stick (8 tablespoons or 4 ounces) unsalted butter, at room temperature
½ teaspoon pure lemon extract

For the Buttercream
1 cup sugar
4 large egg whites
3 sticks (12 ounces) unsalted butter, at room temperature
¼ cup fresh lemon juice (from 2 large lemons)
1 teaspoon pure vanilla extract

For Finishing
2/3 cup seedless raspberry preserves stirred vigorously or warmed gently until spreadable
About 1 ½ cups sweetened shredded coconut

Getting Ready
Center a rack in the oven and preheat the oven to 350 degrees F. Butter two 9 x 2 inch round cake pans and line the bottom of each pan with a round of buttered parchment or wax paper. Put the pans on a baking sheet.

To Make the Cake
Sift together the flour, baking powder and salt.

Whisk together the milk and egg whites in a medium bowl.

Put the sugar and lemon zest in a mixer bowl or another large bowl and rub them together with your fingers until the sugar is moist and fragrant. Add the butter and working with the paddle or whisk attachment, or with a hand mixer, beat at medium speed for a full 3 minutes, until the butter and sugar are very light. Beat in the extract, then add one third of the flour mixture, still beating on medium speed. Beat in half of the milk-egg mixture, then beat in half of the remaining dry ingredients until incorporated.

Add the rest of the milk and eggs beating until the batter is homogeneous, then add the last of the dry ingredients. Finally, give the batter a good 2- minute beating to ensure that it is thoroughly mixed and well aerated.

Divide the batter between the two pans and smooth the tops with a rubber spatula.

Bake for 30-35 minutes, or until the cakes are well risen and springy to the touch – a thin knife inserted into the centers should come out clean. Transfer the cakes to cooling racks and cool for about 5 minutes, then run a knife around the sides of the cakes, unfold them and peel off the paper liners.
Invert and cool to room temperature, right side up (the cooled cake layers can be wrapped airtight and stored at room temperature overnight or frozen for up to two months).

To Make the Buttercream
Put the sugar and egg whites in a mixer bowl or another large heatproof bowl, fit the bowl over a plan of simmering water and whisk constantly, keeping the mixture over the heat, until it feels hot to the touch, about 3 minutes. The sugar should be dissolved, and the mixture will look like shiny marshmallow cream.
Remove the bowl from the heat.

Working with the whisk attachment or with a hand mixer, beat the meringue on medium speed until it is cool, about 5 minutes. Switch to the paddle attachment if you have one, and add the butter a stick at a time, beating until smooth. Once all the butter is in, beat in the buttercream on medium-high speed until it is thick and very smooth, 6-10 minutes.

During this time the buttercream may curdle or separate – just keep beating and it will come together again.

On medium speed, gradually beat in the lemon juice, waiting until each addition is absorbed before adding more, and then the vanilla.
You should have a shiny smooth, velvety, pristine white buttercream. Press a piece of plastic against the surface of the buttercream and set aside briefly.

To Assemble the Cake
Using a sharp serrated knife and a gentle sawing motion, slice each layer horizontally in half. Put one layer cut side up on a cardboard cake round or a cake plate protected by strips of wax or parchment paper.

Spread it with one third of the preserves. Cover the jam evenly with about one quarter of the buttercream.

Top with another layer, spread with preserves and buttercream and then do the same with a third layer (you’ll have used all the jam and have buttercream leftover).

Place the last layer cut side down on top of the cake and use the remaining buttercream to frost the sides and top. Press the coconut into the frosting, patting it gently all over the sides and top.

Serving
The cake is ready to serve as soon as it is assembled, but I think it’s best to let it sit and set for a couple of hours in a cool room – not the refrigerator. Whether you wait or slice and enjoy it immediately, the cake should be served at room temperature; it loses all its subtlety when it’s cold. Depending on your audience you can serve the cake with just about anything from milk to sweet or bubbly wine.

Storing
The cake is best the day it is made, but you can refrigerate it, well covered, for up to two days. Bring it to room temperature before serving. If you want to freeze the cake, slide it into the freezer to set, then wrap it really well – it will keep for up to 2 months in the freezer; defrost it, still wrapped overnight in the refrigerator.

Playing Around
Since lemon is such a friendly flavour, feel free to make changes in the preserves: other red preserves – cherry or strawberry – look especially nice, but you can even use plum or blueberry jam.

Fresh Berry Cake
If you will be serving the cake the day it is made, cover each layer of buttercream with fresh berries – use whole raspberries, sliced or halved strawberries or whole blackberries, and match the preserves to the fruit. You can replace the coconut on top of the cake with a crown of berries, or use both coconut and berries. You can also replace the buttercream between the layers with fairly firmly whipped sweetened cream and then either frost the cake with buttercream (the contrast between the lighter whipped cream and the firmer buttercream is nice) or finish it with more whipped cream. If you use whipped cream, you’ll have to store the cake the in the refrigerator – let it sit for about 20 minutes at room temperature before serving.

My Notes: The instructions here are for the larger cake. If you would like to make the mini-cakes you can use the cooking rings or a small saucer. Cut the cake to the desired size and layer as instructed above.


Verdict
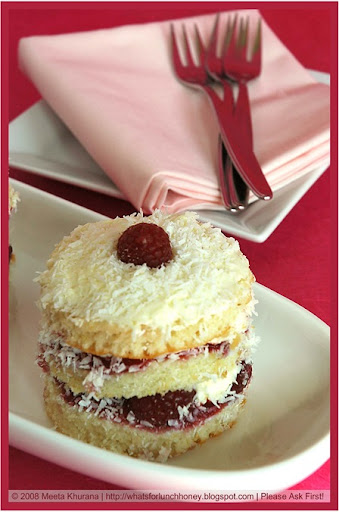
Perfect Party Cake (06) by MeetaK

I loved the lemony aroma of the cake with the fruity raspberry flavor. The fresh raspberries adds a crispness and brings a fantastic texture to the cake. Making min-cakes is so perfect because it does not frighten the guest of getting a huge piece. I was able to cut the mini-cakes in half and serve it to my guest, who we invited for a relaxing Sunday afternoon.

Would I make this again?
I liked the cake. It was easy to put together and we were rewarded with a perfect cake. Full of tangy and fruity flavor. The only thing I might change next time would be either adding a little less buttercream or using whipped cream to make it lighter.

What did I learn from this challenge?
That making layer cakes like this do not have to be tedious. Dorie shows how easy it is and how robust a light, fluffy cake can be. I will be using the recipe for the cake often because I liked the way I was able to handle it without it crumbling and it tasted fantastic.

You'll have a lot of leftovers - the egg yolks and if you make the min-cakes you'll have some cake left over too. Well if you stick around here for the next few weeks, I'll be showing you a few ideas of how you can use the leftovers to make ecstatically delectable desserts. So, please come back!

Thank you Morven for choosing a great Dorie recipe and thank you for allowing us to be as creative as we liked to be. I look forward to seeing what my fellow Daring Bakers have come up with. If you would like to check the other cakes out too just head on over to the Daring Bakers' Blogroll and work your way down the wonderful list of creative bakers.

Other cakes you might enjoy:

Orange Cake 08 framed Orange Cake
CherryCake03 Sour Cream & Cherry Cake
Chocolate Crepe Cake01 Chocolate Crepe Cake


All photographs and written content on What's For Lunch, Honey? © 2006-2008 Meeta Khurana unless otherwise indicated. | All rights reserved | Please Ask First
82 comments Continue »

Sensations: Fresh Fruit with Ginger Mango Sauce

| 29 comments
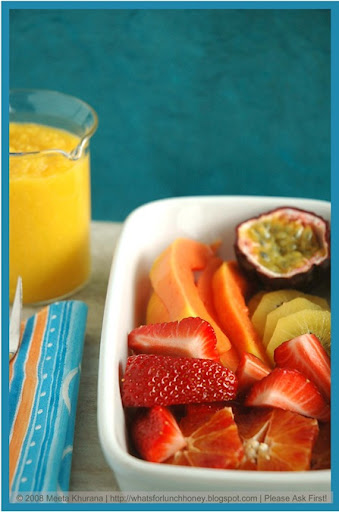
Fruit Ginger Mango Sauce (03) by MeetaK

Growing up in hotels was like living in a constant amusement park. Swimming, jet skiing, boogie boarding, diving, wind surfing, tennis, golf or simply lazing, we could do anything we wanted, whenever we wanted. The fact that we lived in Qatar and were guaranteed 363 days of sunshine, added to the pleasure of the perfect amusement park atmosphere.

As my dad worked in luxury class resort hotels we were also used to doing things others thought of as pure indulgence. Like the fact, we simply went into the main kitchen and helped ourselves to whatever we wanted. The chefs and pastry chefs knew us from a very young age and spoilt us with exotic foods and desserts. We got what we desired whenever we craved it. Sounds like we were spoilt brats, doesn't it?

Thanks to fantastic parents, who always found it very important to teach us the values of respect, modesty and courtesy, both my brother and I never took anything for granted. We always knew where we stood, knew that what we had was something special but nothing we should take advantage of.

So, we always appreciated the waiter who went out of his way to get us a special fruit juice cocktail or adored the pastry chef for making our favorite dessert.

Today, it is upon me to teach these same values to my son. My dad still works for fancy hotels, but now he says he can take leave of playing the teacher role and fully concentrate on spoiling his grandson. As I am currently in Dubai visiting my parents I see so much of history repeating itself. Soeren spends his days on the beach or the pool, lunches are at the restaurant where a buffet of exquisite food is on display. If he does not like something on the buffet, he is guided into the kitchen where he is spoilt rotten by the kitchen staff. He comes back with a bowl of mousse au chocolat, or sticks of chocolate, pasta with tomato sauce - whatever he wants, whenever he wants it.

On one side I have to remind myself that we are on vacation and throughout the year he does not lead this lifestyle. So, I should not be as strict as I think I should be. On the other side he is 5 and at this age, I believe they are ready to be molded into what they become and think later on in life. I have to induce a few valuable lessons. It's a balance act. But I am lucky because I have an intelligent and sensible boy. He takes in what we tell him with an eagerness I have not seen in kids his age. He will repeat things, as if to remind himself, and follow the guidelines to his best ability.

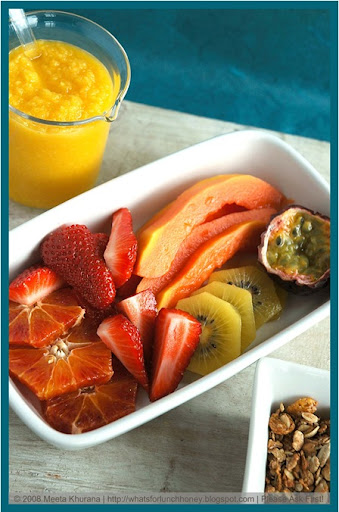
One thing I remember about growing up in the hotel in Qatar was the poolside bar. The food was not specifically out of the ordinary - your typical grilled fish and meat, burgers, sandwiches and salads. However, among all the fancy food readily available to us there was one that I loved. It was a simple platter of fresh fruit served with a delicately flavored fruit sauce, granola and cottage cheese.

Fruit Ginger Mango Sauce (04) by MeetaK

The fruit was always fresh, juicy and sweet, served with the three variations - tangy sauce, crunchy granola and creamy cottage cheese - it was always an exciting new combination of flavors. Perfect after spending part of the day in the hot sun.

Also perfect for this month's Monthly Mingle theme. Abby, who is this month's guest host, selected a spectacular theme for this month - Spring Fruit Sensations. What can be more sensational than a platter of fresh fruit served with mouthwatering condiments?


Ingredients
Printable version of recipe here.

Fruit Ginger Mango Sauce (06) by MeetaK

For the Ginger Mango Sauce

2 small ripe mangoes, peeled and quartered
2 teaspoons fresh ginger, finely chopped
2 tablespoons maple syrup
2-3 teaspoons freshly squeezed lemon juice

Put all the ingredients for the sauce into a food processor and process until the sauce it thick and smooth.

For fruit platter

You can use any fruit you like here. I used:

1 papaya, peeled & sliced
3 yellow kiwis, peeled & sliced
2 blood oranges, peeled & sliced
2 passion fruit, cut in half
Handful of strawberries, quartered

Additional

Granola
Cottage cheese


Method

Fruit Ginger Mango Sauce (07) by MeetaK

Lay all the fruit onto a large platter. Arrange granola and cottage cheese in small bowls.

Serve fruit spooned with the ginger mango sauce, sprinkled with granola or just eat the fruit with cottage cheese.


Verdict

Fruit Ginger Mango Sauce (02) by MeetaK

Fresh, fruity and simply full of spring. There is no better way to describe this. The fruit complemented with the ginger mango sauce is scrumptiously tangy and succulently sweet. I love the added crunch of the granola - it adds a lovely body to the dish. All I say is - sensational!

You might enjoy these fruit sensations too:

ApricotPistachioIceCream01 Apricot and Pistachio Ice Cream
StrawberryMilleFeuille02 Strawberry Mille Feuille
FigsInCherryCaramel 02 Figs In Cherry Caramel


All photographs and written content on What's For Lunch, Honey? © 2006-2008 Meeta Khurana unless otherwise indicated. | All rights reserved | Please Ask First

29 comments Continue »

Spring: Ricotta Vegetable Pot Pies

| 25 comments
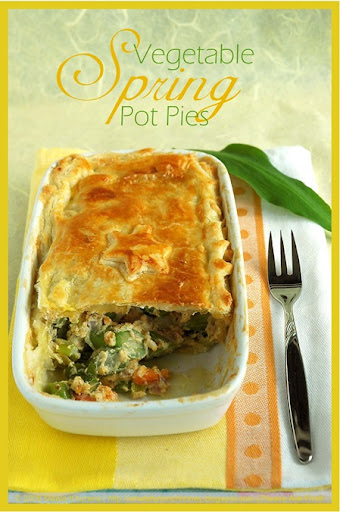
Ricotta Veg Pot Pie (02) by MeetaK

Cooking, like anything else in life, is a passion. If there is no passion in the dishes prepared (or in life), it's tasteless and drab. And who wants tasteless or drab dishes - or life for that matter.

I am a very passionate person and most of the tasks I do are done with enthusiasm and drive. I have always believed that there is something to be learnt from each task, enriching me with new experience.

So, I never give up a chance to learn something new. Especially where it comes to cooking.

I'm here in wonderful Dubai, where the temperatures are simply perfect. An early spring, leaving Germany in the cold and covered in snow, we have been enjoying the sun, beach, pool and of course, the food at my dad's hotel. We arrived here on early Friday morning. My family are the typical foodies. They live through the day from mealtime to mealtime. In between we discuss what we should eat for the next meal!

So, it was no surprising that one of the first discussions we had on Friday was what we should do for dinner. We decided to go to the new fish restaurant at my dad's hotel. The last time we were here it was being renovated. This time I was craving some grilled lobster.

Meals with my family are fantastic. I love them. We all sit and chat for hours about God and the World! This time it was very special because the entire family, including Tom and my brother, were together.

Over mezzas of humus, baba ghanoush, tabouleh, vegetables salads, vine leaves filled with seafood and other great Arabic starters we caught up on each others stories. I had ordered grilled Omani lobster in garlic sauce served with creamy spinach and rice. It was simply exquisite. However, the orgasmic part part of the dinner was still to come. Yes, I really said orgasmic. There is no other superlative to describe what I indulged in. Creamy, smooth, with a slight crunch in the flavors of pistachio, vanilla and mango. Sound good so far right?

As I said at the beginning of this post - I am passionate and was not satisfied with just tasting this elegant dessert in front of me. I requested my dad to set up a date with the pastry chef so he could not only give me the recipe but show me how to make it. Never give up a chance like this!

This week I have sweet date with the pastry chef. I'll be armed with my camera, notepad and pen to learn how to make the most delicious dessert I have had in a long time. What it was? Well of course I will be sharing it with you - but until then I will tease you a little.

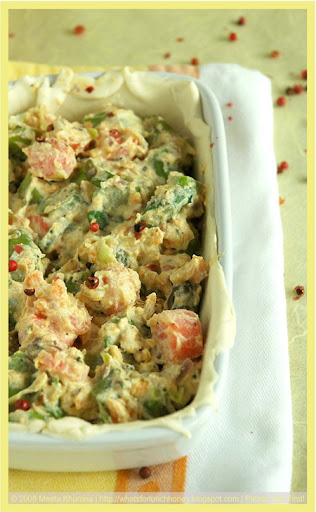
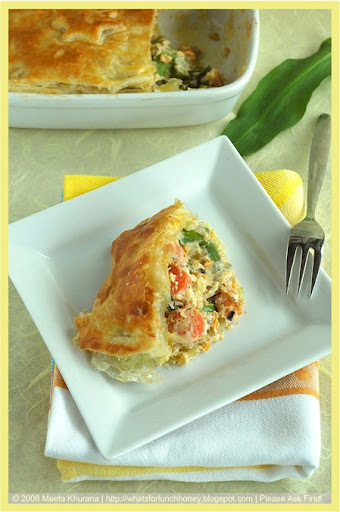
In the meantime, I am sharing a wonderful dish with you. A pot pie made with flaky puff pastry, filled with spring vegetables like green asparagus, carrots and sweet potatoes, scented with ginger and garlic and coated with creamy ricotta. A delight in every way. Making homemade puff pastry makes this dish sensational but you can use any store bought puff pastry too. I like making the puff pastry in large batches and then freeze them in portions to use whenever I want to make something light and flaky.


Reminder!

MM SpringFruitSensations 3 March 2008 250px


The Monthly Mingle gets fruity this month! My guest host Abby has chosen a spectacular theme for this month - Spring Fruit Sensations. So get out your colorful fruit creations and send them over to Abby.


Deadline: April 7th, 2008  

Note: If you are interested in hosting the Monthly Mingle please drop me an email at blogmeeta@gmail.com. Check the Monthly Mingle Guest Host Calendar for more details.


Ingredients
Printable version of recipe here.

RedPeppercorns (01) by MeetaK

Makes 4 single-serving pies

500 - 700g puff pastry
2-3 green onions,  thinly sliced
6-8 green asparagus, cut on the diagonal in about 2 cm pieces
3-4 carrots, sliced
1 sweet potatoes, cut into small cubes
200g ricotta cheese
1 teaspoon ginger, mashed
2 garlic coves, mashed
1 small onion, finely chopped
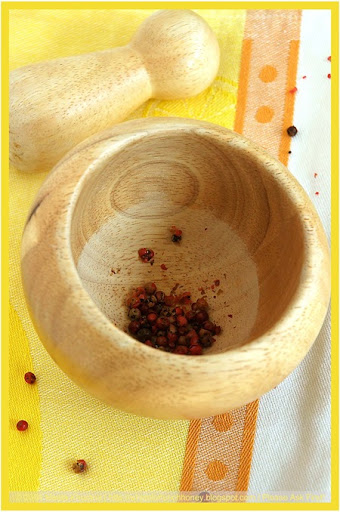
15-20 red peppercorns
Salt and pepper
Herbs de Provence, dried
2-4 tablespoons vegetable stock
2 tablespoons olive oil + more for the pie forms
1 egg
1 teaspoon cream


Method

Ricotta Veg Pot Pie (01) by MeetaK

Preheat oven to 200 degrees C. Brush the ramekin forms with olive oil.

Roll out the puff pastry so that you have enough to line each of the ramekin, plus more to serve as a lid for the pie. Line the forms with the puff pastry and cut out the shape to fit the top of the dishes. Set aside.

To make the filling, steam or blanch the asparagus for 1 minutes. Put in ice cold water to cool. This preserves the lovely bright green color of the asparagus. Steam the sweet potato cubes until slightly soft but still with a little crunch.

Heat 2 tablespoons oil in a large pan on medium heat. Sauté the onions, ginger and garlic until they release a wonderful aroma and become translucent. Add the carrots, sweet potatoes and sauté for a further few minutes. Throw in the asparagus, green onion and the red peppercorns. Stir well. Salt and pepper to taste. Turn off heat and stir in the ricotta. Season with the herbs de Provence.

Check the consistency of the filling. If you would like to make it more liquid-y add some of the vegetable stock to the filling. Stir wee to incorporate the ingredients with each other.

Divide the mixture into each ramekin form. In a small bowl whisk the egg with the cream. Brush the edges of the form and puff pastry lining with the mixture and cover with pastry lid. Finally brush the lid with the egg-wash and bake in the oven for 15-20 minutes until the pastry has puffed up nicely and is golden.


Verdict

Ricotta Veg Pot Pie (03) by MeetaK

Served with a light green salad this is a fantastic dinner. I love the wonderful fragrance of ginger and vegetables. The red peppercorns gives it a hint of sharpness and the herbs de Provence the air of a lovely warm French vacation. Soeren loves the puff pastry together with the creamy ricotta he scoops up the crunchy vegetables till the last bite. Tom prefers this slightly liquidy, I like it more dry - so as they are served in individual ramekin forms you can serve the pies according to anyone's likings.

You might enjoy these pies and tarts too:

512050481_8ae7331117_o Caramelized Vegetable Tarts
Pumpkin Tart 04 Pumpkin Feta Tart
Tomato Olive Tart01 Tomato Olive Tart


This is just perfect for the Mini Pie Revolution, hosted by by Ann of Redacted Recipes. My first time taking part and hope this will be the first of many to come. Thanks Anne for this lovely event.


All photographs and written content on What's For Lunch, Honey? © 2006-2008 Meeta Khurana unless otherwise indicated. | All rights reserved | Please Ask First

25 comments Continue »

Sweet Gifts: Matcha White Chocolate Pralines with Pistachios

| 28 comments
Matcha Pralines (06) by MeetaK

Finally! It's Thursday. My bags are packed, my tickets and passport are tucked safely in my Tote bag and Soeren and I are ready to head out to the airport in Frankfurt. We'll be taking off to Dubai later this evening. Tom is already there and so is my brother - it's going to be a rocking Easter. I can hardly wait to be with the whole family. Tom has already been getting spoilt by my parents and I am green with envy

Green was the color of the week for me in the kitchen this week too. I was busy making extravagant pralines and truffles. Outside it was hailing and snowing and inside I was enjoying the colors of Spring. The green was most definitely a soothing color for the eyes.

Why was I making truffles and pralines when I am leaving for two weeks?

Well, so that my dear friends do not forget me when I am gone LOL! See as I will not be around for Easter to spoil them with my Easter brunch, I thought I would make them little treats to nibble on. This way they'll have me in their thoughts and I just love to know that people are thinking of me - in a sweet way. ;-)

I often do this. There is nothing nicer than saying a "Thank you!" or showing my appreciation to a special friend with homemade sweet gifts. So, instead of going out and buying expensive and impersonal chocolates, making delicate pralines spiced with love and care at home gives me a certain pleasure that I cannot compare with anything else.

I have a handful of friends I like to spoil in this way. I love them for all what they give to me. They are there to make me laugh, support me in my need, party with me, cry with me, shop till they drop with me and bitch with me. Just everything what friends do for and with each other. In return I try to be the best friend I can to them and show them my affection with little nibbles. That's another thing I love them for - they are always game for my experiments.

Matcha Pralines (02) by MeetaK

These pralines bring together the delicate flavors of matcha powder, the rich texture of white chocolate and the crunch from pistachios. The ganache for most pralines and truffles is made with cream, in this however, I simply used milk. The ganache is then cooled and beaten till light and fluffy. The result: a mouse-like texture, airy and light. Simply perfect.

For those who have not experimented with matcha powder, I do have to tell you it is a flavor that needs to develop. I am still in the development phase. Trying and experimenting, sometimes the flavors work and other times I do not take a fancy to the recipe. Matcha has a very unique flavor - it's earthy, slightly bitter and sometimes it takes a few tries before one takes a liking to it.

I am sure you will love these though. Enjoy!


Reminder!

MM SpringFruitSensations 3 March 2008 250px


The Monthly Mingle gets fruity this month! My guest host Abby has chosen a spectacular theme for this month - Spring Fruit Sensations. So get out your colorful fruit creations and send them over to Abby.


Deadline: April 7th, 2008  


Ingredients
Printable version of recipe here.

Matcha Pralines (03) by MeetaK

300g white chocolate, coarsely chopped
75 ml milk
2 teaspoons Matcha powder
100g pistachios, finely chopped


Method

Matcha Pralines (04) by MeetaK

Line a baking tray that will fit into your refrigerator with parchment paper.

Heat the milk in a saucepan until steaming. Add the matcha powder and stir to dissolve. Make sure the milk mixture does not boil. Add the chocolate in portions, stirring until each portion has melted.

Pour the chocolate-matcha mixture into a bowl and refrigerate for about 1 hour.

Once cooled, take out and using the whisk attachment of your hand-mixer, beat the chocolate-matcha mixture until light and creamy. Fill the cream in a piping bag and pipe out chocolate balls the size of cherries on the baking tray.

Place the tray back into the refrigerator for another 30 minutes. In the meantime put the pistachios into a large bowl and set aside.

Take the pralines out of the refrigerator. Using the palms of your hands quickly roll each chocolate portion into smooth balls. Place the pralines into the bowl with the pistachios and gently toss them, coating the pralines with the nuts.

Tip: When you are rolling the matcha-chocolate balls with your hands, I recommend placing a bowl of ice cold water next to you. In between dip your hands in the water to cool them. This way the chocolate will not melt with the warmth of your hands.


Verdict

Matcha Pralines (05) by MeetaK

These were incredibly fluffy and light. I was not expecting Soeren to like them - but the boy surprises me every time! He could not get enough of them. I had to take a few out for him and hide the rest LOL! The aroma of the matcha is very delicate in this. Just a hint but still very much there. I loved the crunchy pistachios - it added a lovely texture rounding the praline up nicely. I hope my friends enjoy these when they open the little chiffon bags and find these pralines inside.

I am also taking a few bags with me to Dubai - after all my parents, brother and Tom deserve to find these jewels on Easter too.

As I am taking my notebook with me, you'll be hearing from me every now and then. I have a few great posts lined up - they'll be strawberries, raspberries, pulses, pot pies and shiny metal all coming your way so stay tuned. In the meantime have a very Happy Easter and have fun hunting for your sweet gifts!

You might enjoy these treats too:

NougatOrangeTreats2 Nougat Orange Treats
HavannaPraline3 Havanna Pralines
Truffles 2 Rich Creamy Truffles


More Matcha creations from other blogs:

Fresh From The Oven: Chocolate Matcha Loaf Cake
Day Dream Delicious: Matcha Cupcakes
Nami-Nami: Matcha Cookies
La Tartine Gourmande: White Chocolate and Matcha Tea Marbled Cake
Jaden's Steamy Kitchen: Matcha White Chocolate Ice-cream

I am thrilled to send these sweet gifts to Danielle of Habeas Brulee, who is the hostess of Sugar High Friday this month. Her theme is wonderful one - a dedication to friends, families and everyone who receives sweet gifts. Thanks for a wonderful theme Danielle!


All photographs and written content on What's For Lunch, Honey? © 2006-2008 Meeta Khurana unless otherwise indicated. | All rights reserved | Please Ask First

28 comments Continue »

Cooking School: Hot Cross Buns

| 36 comments
Hot Cross Buns (01) by MeetaK

Take a second look at the title of this post. That's right: Cooking School: Hot Cross Buns. The last time I looked, Hot Cross Buns fell under the category of Breads. Now take a look if you are on the right blog!

Yup! You are on What's For Lunch, Honey? and yes you are seeing this correctly. I am indeed presenting you with self baked bread outside of a Daring Baker's challenge, that is. If you have no idea what I am talking about then I presume you are new around these parts and would like to direct you to this post. That was my last challenge and as you can see I fear bread baking.

After reading the many comments and emails I got from that post I was rather amazed. Amazed, because you all seem to think that I was fearless. Well I guess Mighty Meeta's Kryptonite is bread baking.

Like any fearless super hero I decided to grab the proverbial bull by its proverbial horns and take this fear factor head on. I have been collecting a few bread recipes in the past few days and hope to present you with a few more bread varieties on this blog - outside of the DB challenges!

Do you see the Categories section on the sidebar? Well you all know how it works - click on the label and you get a list of all the recipes/articles filed under that particular category. The ones that have a larger font simply means that there are more recipes/articles under that category. Now look at the size of my breads category. It's minute! My aim this year is to make that label grow in font size!

As Easter is just around the corner I decided to start with Hot Cross Buns.

What are Hot Cross Buns?

Hot Cross buns have been a symbol of Good Friday for decades. They are specifically sold in bakeries and supermarkets throughout the Easter season. Each bun has cross piped, either with icing, pastry or glaze, on top to signify the crucifixion.

In England, they were once sold by street vendors who advertised their buns with cries of "Hot Cross Buns! "Hot Cross Buns!"

These street cries became the famous nursery rhyme. Do you remember?

Hot cross buns,
Hot cross buns,
one ha' penny,
two ha' penny,
hot cross buns.
If you have no daughters,
give them to your sons,
one ha' penny,
two ha' penny,
Hot Cross Buns

As I went to a British School, I certainly remember singing the rhyme. I would not say the Hot Cross Buns I have had in my life were of the gourmet kind but they were certainly delicious. I loved the smell of the spices and the sweet aroma of the raisins when the buns were cut open and toasted on the toaster.

In Christian history, the buns were traditionally eaten on Good Friday, with the cross depicting the crucifixion of Jesus Christ. Although they have been a Lenten and Good Friday tradition for centuries, Hot Cross Buns were not always associated with Christianity. The origins of the crumb lie in pagan traditions of ancient cultures, with the cross representing the four quarters of the moon. During early missionary efforts, the Christian church adopted the buns and re-interpreted the cross. In 1361, a monk named Father Thomas Rockcliffe began a tradition of giving Hot Cross Buns to the poor of St Albans on Good Friday.

In years that followed, many customs, traditions, superstitions, and claims of healing and protection from evil and were associated with the buns. In the 16th century, Roman Catholicism was banned in England, but the popularity of Hot Cross buns continued. Queen Elizabeth I passed a law banning the consumption of Hot Cross Buns except during festivals such as Easter, Christmas and funerals.

Source:
Wikipedia

The recipe I used must have been as old as Queen Elizabeth I herself, because it was taped in my recipe notebook and looked rather faded and tattered. The handwriting was not mine and I cannot remember for the life of me who gave me the recipe. I normally write the names down of the people who gave me the recipes but I only started doing this for the past 8-9 years! So the recipe is certainly older than that. What attracted me to the recipe was the use of all-spice.

The recipes I found during my comparison research did not have all-spice listed in them. It's a spice I really like, but do not use very often in my kitchen outside of the Christmas baking. I also liked that the buns were piped with a mixture of flour and water and not icing. As far as I remember the British either cut the crosses in the buns or use the flour/water pastry mixture to pipe the crosses - never with icing. The reason behind this is because the buns are made a few days ahead and should be enjoyed toasted with only butter spread thickly on the warm bread. Using icing sugar will only cause it to burn when toasted.

Hot cross buns,
Hot cross buns!

Extra Read: My latest article is out on FoodieView. This week I am Re-thinking Casseroles!


Reminder!

MM SpringFruitSensations 3 March 2008 250px


The Monthly Mingle gets fruity this month! My guest host Abby has chosen a spectacular theme for this month - Spring Fruit Sensations. So get out your colorful fruit creations and send them over to Abby.


Deadline: April 7th, 2008 


Ingredients
Printable version of recipe here.

Hot Cross Buns (02)  by MeetaK

14g dry active yeast or 30g fresh yeast
500g white flour for bread, plus more for dusting
3 tablespoons sugar
2 teaspoons ground mixed spices - I used cinnamon, all-spice, nutmeg, cloves and ginger 
40g butter
200g raisins

Pastry for the crosses:
30g flour
1/4 teaspoon sugar

For the glaze
1 1/2 tablespoon sugar
1 teaspoon gelatine powder


Method

Hot Cross Buns (04)  by MeetaK

Prepare a baking sheet by lightly greasing it.

In a small bowl incorporate the yeast, 2 teaspoons flour, 1 teaspoon sugar and 125 ml luke warm water well. Cover with a with a damp cloth and place in warm place for about 10 minutes to activate the yeast. After the 10 minutes your yeast mixture should be frothy and bubbly. If this is not the case this means that your yeast is too old and you will have to proof it again with fresh yeast.

In a larger bowl sift the flour and the spices, then mix in the sugar. Add the butter and knead with your fingertips until it resembles breadcrumbs. Throw in the raisins. Make a well in the middle of the flour and pour in the yeast mixture and 185ml water. Using your hands gently mix in the flour into the yeast mixture. Knead into a smooth dough.

Dust the countertop lightly with some flour then tip out the dough and knead for 5 minutes until the dough is soft and smooth. Dust a large bowl with flour. Shape a ball out of the dough and place into the bowl and cover with a damp cloth. Place in a warm place for 30-40 minutes until the dough has doubled in volume.

Preheat the oven to 200 degrees C.

Tip the dough onto the counter and give it another good kneading. Divide into 12 equal parts, then roll each portion into a ball and place on the greased baking tray. Place each ball of dough so that they are touching each other. Cover the tray with a damp cloth and allow to rest in a warm place for another 20 minutes. They balls of dough will double in volume again.

Pastry for the crosses:
Mix the flour, sugar and 2 1/2 tablespoons water into a thick, smooth paste-like mixture. Fill into a piping bag or a small sandwich bag with a slight cut at one of the corners. Now pipe crosses onto the buns.

Slide the baking tray into the oven and bake for 20 minutes until golden brown.

For the glaze
In the meantime prepare the glaze by mixing the sugar, 1 tablespoon water and the gelatine powder in a small saucepan. Mix until dissolved. On low heat heat the mixture until the mixture is smooth.

When the buns come out of the oven brush the buns while still hot with the glaze.

Allow to cool. The best way to enjoy the buns are cut, toasted and with lots of good butter. Hmmmn! You can serve these for a Easter breakfast or brunch.


Verdict

Hot Cross Buns (03)  by MeetaK

This is incredible. I think I am getting used to this rising and kneading thing as it is proving to be rather therapeutic. While the dough was doing its first rise I was able to complete a relaxing session of yoga. The kneading helps to take away and frustrations and on the second rise I was able to do my nails. LOL! The buns were simply delicious. They rose perfectly, took on a wonderful golden color and the whole house smelled of spices. We enjoyed these for breakfast on the weekend, lightly toasted on the toaster. Soeren spread honey on his, Tom red current jam and I just had it with butter. I think I will make these every now and then for sure and it does not always have to be Easter! ;-)

As I am quite proud of these little babies, I am sending these to - wait for it - Bread Baking Day! This month's hostess is Susan of Wild Yeast and her theme is focusing on the upcoming Spring seasonal holidays - Easter St. Patrick's Day and so on! I've watched from the sidelines and almost took part in last month's Flatbreads theme but chickened out instead. I hope I can often take part in this event from now on LOL!

To celebrate Easter I have thoughtfully and carefully put together a few menu ideas for you. Hope you enjoy them. I'll be in Dubai with my parents, Tom and Soeren, enjoying the sun and looking for Easter eggs in the sand.

Easter menu "Flavors":

Starter: CarrotGingerSoup2 Creamy Ginger Carrot Soup wit Lemon Cream
Entrée: TeriyakiSalmon04 Honey Teriyaki Salmon with Mange-Tout
Dessert: Lemon Meringue Pie 05 Lemon Meringue Pie


Easter Menu "Non-Vegetarian":

Starter: DSC02704 Spinach Soup with Coconut milk and Chicken
Entrée: Geschnetzeltes03 Creamy Veal and Mushroom Pie with Potato Crust
Dessert: RaspberryChocolateTiramisu01 Raspberry Chocolate Tiramisu


Easter Menu "Vegetarian":

Starter:  SpinachSalad02 Spinach Salad with Goat Cheese and Avocado
Entrée:  DSC02715 Mustard Eggs with Rice Duo
Dessert:  RaspberryDreamCream07 Raspberry Dream Cream


When I made these last week, Nandita of Saffron Trail and I were chatting and I showed her the pictures I took of these buns. She instantly wanted one. I told her she'd have to make them herself. Well she did and we decided to post on the same day. Do check out Nandita's version of Eggless Hot Cross Buns.


All photographs and written content on What's For Lunch, Honey? © 2006-2008 Meeta Khurana unless otherwise indicated. | All rights reserved | Please Ask First

36 comments Continue »

Monthly Mingle 18: One-Dish Dinners Roundup

| 26 comments
ODD 1

The ease of one-dish dinners such as casseroles are known to all of us. When I chose this theme I wanted this roundup to be a reference for all of us who have a tight daily schedule but still want to serve up a delicious meal.

With 60 entries this One-Dish Dinner roundup is going to be one very useful reference to browse through. Hope you enjoy the roundup. I thank all my guests who joined me and brought their wonderful creations.

  1. Culinary Bazaar: Grilled Eggplant Moussaka with Brown Rice
  2. More Than Burnt Toast: Skillet Lasagna
  3. My Veggie World: Vegetable Pongal
  4. Foodie's Hope: Pomegranate Soup
  5. Cooking 4 All Seasons: Vegetable Rice
  6. Chez Denise Et Laudalino: Japanese Inspired Pot Roast
  7. Enjoy Indian Food: Wheat sprouts Khichdi
  8. The Singing Chef: Khichdi and Kadhi
  9. Passionate About Baking & Beyond: Biryani/Yakhni Pulao
  10. What's Cooking?: Chicken Pot Pie with a twist
  11. Greedy Gourmet: Pork Sausage, Leek, Carrot & Butter Bean Casserole
  12. For The Cook in Me: Easy Tomato Spaghetti with Shredded Chicken
  13. Dragon Musings: Mum's Chow Mein
  14. Dil Se...: Corn-Peas Cheese Pulao
  15. Simple Indian Food: Kadamba Saadam (Mixed Rice)
  16. Escapades: Spicy Tagliatelle with Vegetables

    ODD 3

  17. The Taste Tinkerer: Savory Bread Pudding
  18. Gatinah Na Cozina: Brown Kitten Bowl
  19. Mirch Masala: Hungarian Goulash
  20. Indian Vegetarian Kitchen: Akki Roti
  21. Spicy Tasty: Rava Kichadi (Semolina pudding)
  22. Ahaar: Fish Biryani
  23. Ruth's Kitchen Experiments: Chicken Paella
  24. I googled, I saw, I cooked: Vegetable Couscous
  25. Le Petit Kitchen: Minestrone
  26. Kailas Kitchen: Corn Meal-Rava Kichadi
  27. eat the right stuff: leek and bacon black eyed bean bake
  28. Spicy Thali: Eggs on Potato
  29. Archy's Recipe Book: Spinach Rice
  30. Fun and Food: Baked Rigatoni Pasta with Homemade Garlic and Basil Marinara Sauce
  31. Hooked On Heat: Curry Noodle Bowl
  32. Finger Licking Food: Gowdru Pulao

    ODD 2

  33. Zaiqa: Hyderabadi Biryani
  34. teczcape - an escape to food: Savory congee, one pot rice porridge
  35. I think I have a recipe for that: Duck Laksa
  36. Yambalaya: Cauliflower Gratin
  37. Rina's Recipes: Slow Cook Chunky Meat and Veggie Stew
  38. Canela & Comino: Peruvian Arroz con Pollo (Peruvian Chicken with Rice)
  39. Bird Food: Sausage, Bacon and Cheddar Cheese Quiche
  40. Randomosity and the Girl: Minestrone Soup
  41. Peppermill: Creamy Curried Eggplant and Pumpkin Risotto
  42. Annarasa: Pasta with Chickpeas and Parsley
  43. Live To Eat by Anty: Indonesian Curry
  44. Mele Cotte: Turkey Sausage Rice
  45. Spice is Right: Urban Dal Dhokli Under Pressure (Indian stew)
  46. Khichdi: Haleem
  47. Dhivya's Cuisine: Potato Fried Rice
  48. All Things Edible: Chicken Pot Pie

    ODD 4

  49. A Cook At Heart: Bisi Bele Hulli Anna
  50. Saffron Trail: Cracked wheat with tons of veggies
  51. Mrs. W's Kitchen: Cheesy Chicken Burrito Soup
  52. Cook With Love: Corn Methi Rice
  53. Live :: Love :: Laugh :: Eat!: New England Pot Roast
  54. An attempt to Spread love by cooking : Sev Khamani
  55. Sass & Veracity: Crab & Andouille Jambalaya
  56. Live to Eat by Sig: Sausage Fried Rice
  57. Taste Of Mysore: Tomato Rice
  58. Green Gourmet Giraffe: Vegetable Nut Crumble
  59. What's For Lunch, Honey?: Bulgur with Vegetables & Feta
  60. Finally, Kathy Crawford in Salem, OR sent me this delicious sounding crockpot recipe:
    Crock Pot Roast

    2 cans cream of mushroom soup
    2 cans beef broth
    1 package dry onion soup mix
    3 cloves garlic, chopped
    3 tablespoons red pepper sauce (Tabasco)
    1 3-4 lb roast (any kind since it will cook all day)
    1 onion sliced thin
    3-4 potatoes peeled and chunked
    3-4 carrots peeled and chunked or 2 handfuls of baby carrots
    1 cup fresh sliced mushrooms
    Salt and pepper to taste
    3 tablespoons cornstarch
    In crockpot, mix together first 5 ingredients.  Add meat and vegetables. Spoon some of the soup mixture over meat and vegetables to distribute flavors.  Add salt and pepper to your taste.  Cover and cook on low 6-8 hours.  Remove meat and vegetables to serving tray.  Turn crock pot on high.  Mix cornstarch with water and add to broth mixture.  Stir to thicken gravy.  Pour gravy over meat and vegetables and serve.
    I use a 5-quart oval crockpot.  Increase or decrease ingredients to fit your crockpot.

  61. Updates:
  62. The Lierate and the Liberate Foodie - Easy Enchiladas


That wraps up this 18th edition of the Monthly Mingle. Great recipes, great people and great blogs. Please do take a few minutes to browse through them.

The theme for the next mingle has already been announced. Check it out here and here. 

If you would like to guest host the Monthly Mingle please contact me at bloogmeeta@gmail.com.

See you at the next roundup!


All photographs and written content on What's For Lunch, Honey? © 2006-2008 Meeta Khurana unless otherwise indicated. | All rights reserved | Please Ask First

26 comments Continue »