Daring Bakers: Pizza with Caramelized Fennel, Radicchio, Pears, Spinach, Prosciutto di Parma, Roasted Tomato Sauce, Nuttela and Almonds

| 62 comments

Daring Bakers Challenge October 2008

 Pizza Toppings (01) by MeetaK

~ In memory of Sherry “Sher” Cermak 1948-2008 ~

Just a few of the ingredients I used for this months Daring Bakers' challenge. On one pizza? No of course not. And what are the Daring Bakers doing making pizza, you must be thinking? What's daring about that?

Well this is what I love about the group. We get to try our hands at everything and this would not be a daring group if we were making any ole pizza!

This month it was Rosa of Rosa's Yummy Yums who was hosting the challenge. Initially she was going to co-host the challenge with Sher, but life takes sad unexpected turns. To honor her memory Rosa decided to carry through with Sher's chosen recipe for the October challenge.

The challenge was to make pizza dough using the recipe from The Bread Baker’s Apprentice by Peter Reinhart and using the tossing method! This was going to be fun. Otherwise we were free to use our imaginations. This was going to be a lot of fun.

I chose to make this quite early on in the month. Tom was away for the weekend and Soeren and I decided to tackle the challenge together. The tossing method with a 6 year old is a hilarious event. After the kitchen looked like we had just been snowed in with flour we decided to really get to work.

We are your typical family who love pizza - but are a bit picky. We have very specific likings to our pizzas and our notion of pizza is a perfect thin crusted one rather than the greasy deep pan pizza. Our pizzas have just a few toppings, going for a medley of full flavor rather than piling on the ingredients. We often make pizza at home and over the years we have found a few basics we stick to - basics like the dough, the spice oils and the tomato sauce.

So that is why I was quite keen on trying another type of pizza dough.

Pizza Dough (01) by MeetaK

Basic Pizza Dough

Original recipe taken from “The Bread Baker’s Apprentice” by Peter Reinhart.

Ingredients
Printable version of recipe here.

Makes 4-6 pizza crusts (about 9-12 inches/23-30 cm in diameter).

4 1/2 Cups (20 1/4 ounces/607.5 g) Unbleached high-gluten (%14) bread flour or all purpose flour, chilled
1 3/4 Tsp Salt
1 teaspoon Instant yeast
1/4 Cup (2 ounces/60g) Olive oil or vegetable oil (both optional, but it’s better with)
1 3/4 Cups (14 ounces/420g or 420ml) Water, ice cold (40° F/4.5° C)
1 tablespoon sugar
Semolina/durum flour or cornmeal for dusting

Method

Day one

Mix together the flour, salt and instant yeast in a big bowl (or in the bowl of your stand mixer).

Add the oil, sugar and cold water and mix well (with the help of a large wooden spoon or with the paddle attachment, on low speed) in order to form a sticky ball of dough. On a clean surface, knead for about 5-7 minutes, until the dough is smooth and the ingredients are homogeneously distributed. If it is too wet, add a little flour (not too much, though) and if it is too dry add 1 or 2 teaspoons extra water.

If you are using an electric mixer, switch to the dough hook and mix on medium speed for the same amount of time. The dough should clear the sides of the bowl but stick to the bottom of the bowl. If the dough is too wet, sprinkle in a little more flour, so that it clears the sides. If, on the contrary, it clears the bottom of the bowl, dribble in a teaspoon or two of cold water.

The finished dough should be springy, elastic, and sticky, not just tacky, and register 50°-55° F/10°-13° C.

Flour a work surface or counter. Line a jelly pan with baking paper/parchment. Lightly oil the paper.

With the help of a metal or plastic dough scraper, cut the dough into 4-66 equal pieces (or larger if you want to make larger pizzas).

To avoid the dough from sticking to the scraper, dip the scraper into water between cuts.

Sprinkle some flour over the dough. Make sure your hands are dry and then flour them. Gently round each piece into a ball.

If the dough sticks to your hands, then dip your hands into the flour again.

Transfer the dough balls to the lined jelly pan and mist them generously with spray oil. Slip the pan into plastic bag or enclose in plastic food wrap.

Put the pan into the refrigerator and let the dough rest overnight or for up to thee days.

NOTE: You can store the dough balls in a zippered freezer bag if you want to save some of the dough for any future baking. In that case, pour some oil (a few tablespoons only) in a medium bowl and dip each dough ball into the oil, so that it is completely covered in oil. Then put each ball into a separate bag. Store the bags in the freezer for no longer than 3 months. The day before you plan to make pizza, remember to transfer the dough balls from the freezer to the refrigerator.

Day Two

On the day you plan to eat pizza, exactly 2 hours before you make it, remove the desired number of dough balls from the refrigerator. Dust the counter with flour and spray lightly with oil. Place the dough balls on a floured surface and sprinkle them with flour. Dust your hands with flour and delicately press the dough into disks about 1/2 inch/1.3 cm thick and 5 inches/12.7 cm in diameter. Sprinkle with flour and mist with oil. Loosely cover the dough rounds with plastic wrap and then allow to rest for 2 hours.

At least 45 minutes before making the pizza, place a baking stone on the lower third of the oven. Preheat the oven as hot as possible (500° F/260° C).

If you do not have a baking stone, then use the back of a jelly pan. Do not preheat the pan.

Generously sprinkle the back of a jelly pan with semolina/durum flour or cornmeal. Flour your hands (palms, backs and knuckles). Take 1 piece of dough by lifting it with a pastry scraper. Lay the dough across your fists in a very delicate way and carefully stretch it by bouncing it in a circular motion on your hands, and by giving it a little stretch with each bounce. Once the dough has expanded outward, move to a full toss.

Make only one pizza at a time.

During the tossing process, if the dough tends to stick to your hands, lay it down on the floured counter and re-flour your hands, then continue the tossing and shaping.

In case you would be having trouble tossing the dough or if the dough never wants to expand and always springs back, let it rest for approximately 5-20 minutes in order for the gluten to relax fully, then try again.

You can also resort to using a rolling pin, although it isn’t as effective as the toss method.

When the dough has the shape you want (about 9-12 inches/23-30 cm in diameter - for a 6 ounces/180g piece of dough), place it on the back of the jelly pan, making sure there is enough semolina/durum flour or cornmeal to allow it to slide and not stick to the pan.

Lightly top it with sweet or savory toppings of your choice.

NOTE: Remember that the best pizzas are topped not too generously. No more than 3 or 4 toppings (including sauce and cheese) are sufficient.

Slide the garnished pizza onto the stone in the oven or bake directly on the jelly pan. Close the door and bake for about 5-8 minutes.

NOTE: After 2 minutes baking, take a peek. For an even baking, rotate 180°.

If the top gets done before the bottom, you will need to move the stone or jelly pane to a lower shelf before the next round. Should the bottom crisp before the cheese caramelizes, then you will need to raise the stone or jelly.

Take the pizza out of the oven and transfer it to a cutting board or your plate. In order to allow the cheese to set a little, wait 3-5 minutes before slicing or serving.


Pizza Spice Oils (01) by MeetaK 

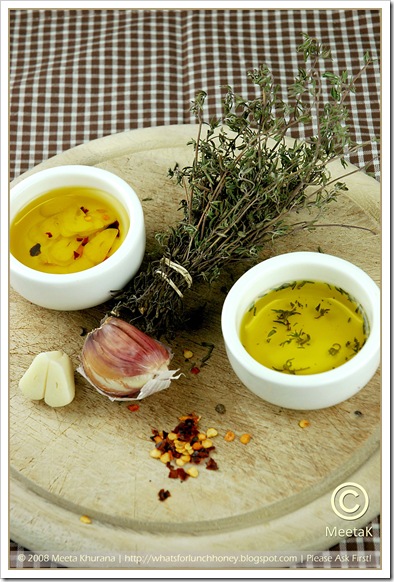
Another basic for our pizza are spiced oils. These are used to pour into the pizza sauce or toss rucola, radicchio, chard or spinach to give these leafy toppings a lovely aroma. I normally infuse olive oil with herbs, like thyme, rosemary, oregano or marjoram. Garlic, ginger or chili flakes give the oil an extra body and a powerful flavor. Try using a delicate organic extra virgin olive oil because you will really taste the difference. For these pizza selections I infused the oil with 2 varieties: garlic and chili flakes for the sauce and dried thyme for the radicchio.

Infusing the oils is fairly easy and does not require an extra recipe. I normally buy small sealable glass bottles to store the oils in, because the longer the oils are infused the more time they have to enfold their aromas. However if you do not have time to infuse the oils for that long, even a 3-6 hour quick-infusion will be sufficient. Simply pour the amount of oil you require in small bowls and add your herbs and spices. Then just forget about it while you tackle the rest of your pizza.

Pizza Cheese (01)by MeetaK

Cheese is an important element in a pizza and something I like to experiment with. My organic store has an incredible cheese counter - a cheese for every occasion, or every pizza if you prefer. Fontina, Roquefort, Manchego, Goat cheese, Gruyere or even a dollop of quark are all some of my favorite types of cheese for pizza.

Some say a pizza is made or broken with the pizza sauce. I agree. If a pizza uses tomato sauce as a base for the toppings, I believe it should blend well with the rest of the flavors used in the pizza. It should not overpower and I prefer it chunky rather than puréed. I also prefer using a mix of cherry tomatoes and passata.  For this pizza I gently roasted the tomatoes for 45 minutes in the oven with some thyme spice olive oil and a few slivers of garlic. 

Once out of the oven the cherry tomatoes were thrown into the passata, garlic and all, and gently simmered.

The recipe below makes a fairly large batch of roasted tomato sauce. It’s also perfect for pasta sauces or as a base for stews, goulash our even soups. Stored in air-tight Weck jars the sauce keeps for 3-4 days in the refrigerator. You can also freeze the sauce in Ziploc bags for up to a month. This is a superb sauce so full of flavor and you’ll definitely want to make a big enough batch that goes around for a while.


 Pizza Sauce (01) by MeetaK

Roasted Tomato Sauce

Ingredients
Printable version of recipe here.

500g cherry tomatoes, cut in half
3-4 garlic cloves, thinly sliced
500g tomato passata
1 tablespoon thyme spiced olive oil
2 tablespoon garlic-chili spiced olive oil
1 large red onion, coarsely chopped
Fresh or dried thyme
Salt and pepper

Method

Preheat the oven to 150 degrees C. Line a baking tray with aluminum foil.

In a large bowl toss together the tomato halves, garlic slivers, thyme spiced oil and a pinch of salt. Spread out on the baking tray and bake in the oven for 40-45 minutes. Keep an eye on the tomatoes and if required reduce the heat if they start to get too brown.

In a large pot pour in the passata and the garlic spiced olive oil. Bring to a simmer, then add onions and roasted tomatoes, including garlic, into the mixture.

Simmer for 15-20 minutes until the onions softened and the sauce thickens. Sprinkle with thyme, salt and pepper to taste.

Notes:

  • If you are planning on storing the tomato sauce in jars, pour in sterilized jars 
  • If you are planning to freeze the sauce in Ziploc bags, allow the sauce to cool completely before pouring it in the bags.


Caramelized Fennel, Radicchio, Pears and Goat Cheese Pizza  

Pizza Fennel Raddichio (01) by MeetaK

Finally it’s time for the toppings. For me pizza is like a canvas and I love painting it with a variety of aromatic ingredients. Each ingredient harmonizes perfectly with the other complementing each flavor combination.

For this challenge I made three pizzas, each very different from the other and each highlighting an entirely different flavor combination.

Which is your favorite flavor combination?

Ingredients

Printable version of recipe here.

2 fennel bulbs, sliced
1 teaspoon maple syrup
Small head of radicchio
2-3 small pears, thinly sliced
Soft goat cheese
Pecans, roughly chopped
1 tablespoon thyme spiced olive oil
150g herb quark,  simply chop up some fresh herbs of choice and mix into the quark.
Salt and pepper
1 portion basic pizza dough

Method

Preheat oven to 200 degrees C.

In a large bowl toss the fennel with the thyme spiced oil. Heat a large skillet to medium-high and sauté the fennel slices. Add the maple syrup and mix. Once the fennel begins to soften, turn the heat down and sauté gently until the fennel caramelizes and releases its aromatic fragrance.

Make sure you stir frequently so that the fennel does not stick to the bottom of the pan. This normally takes 15 to 20 minutes.

Spread the prepared pizza base with the herb flavored quark, the caramelized fennel and pear slices. Break off a few edges of the goat cheese and lay out on the pizza. Finally sprinkle with the chopped pecans.

Bake in the oven for 8-10 minutes or until the base is crispy. Take out of oven sprinkle with salt and pepper then arrange the radicchio leaves over the top.

Allow to rest for 2-3 minutes, then slice.

Helpful reads:


Pizza Fennel Raddichio (02) by MeetaK

 Prosciutto di Parma, Spinach and Gruyere Pizza 

Pizza-Parma Spinach (02) by MeetaK

Ingredients
Printable version of recipe here.

5-6 slices prosciutto di Parma
Handful of fresh baby spinach
150g roasted tomato sauce
100g Gruyere cheese, grated
1 portion basic pizza dough
Salt and pepper

Method

Preheat oven to 200 degrees C.

Generously spread the prepared pizza base with the roasted tomato sauce. Salt and pepper to taste. Sprinkle the cheese and bake in the oven for approx. 8-10 minutes.

Take out and arrange the ham and spinach leaves on top of the pizza.

Allow to rest for 2-3 minutes, then slice.


Pizza-Parma Spinach (01) by MeetaK

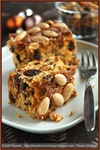
 Nutella, Pears and Toasted Almonds Pizza

Pizza-Nutella (01) by MeetaK


Ingredients
Printable version of recipe here.

Several large tablespoons of Nutella
2 pears, thinly sliced
Handful almonds, sliced
Powdered sugar
1 portion basic pizza dough

Method

Preheat oven to 200 degrees C. Line a baking tray with waxed paper.

Using a cookie cutter or a glass cut circular shapes out of the prepared pizza base. Place each mini-pizza on the baking tray.

Generously spread each mini-pizza with Nutella. Arrange the pear slices and sprinkle with the almond slivers.

Bake in the oven for approx. 8-10 minutes. Remove and sprinkle with powdered sugar.


Verdict

“Nutella Pizza for dessert rocks!” was the all thumbs up verdict from Soeren. What surprised me the most was that he seemed to like the fennel radicchio combination a lot more than the expected Parma ham and spinach. I had made that pizza extra for him thinking he would not like the fennel-radicchio pizza that much. But to my surprise he wanted more than the one slice I had given him to taste. The Parma-spinach pizza combination is one of the regular types of pizzas we often make. Sometimes I will substitute the spinach with rucola and the prosciutto with bresaola.

Would I make this again?

This is very similar to the pizza dough I regularly make at home. The only difference my proofing/rising takes just an hour in a warm place. Tossing is not going to be something we will do often when making pizza though. Although we had a great laugh, the tossed dough was hardly usable, after it had flown two or three times through the kitchen and swept up the floor. We’ll be sticking to the trusty rolling pin.

What did I learn from this challenge?

That I can proof the dough in the fridge overnight for a more hassle free pizza. I know this might seem pretty normal to most of you, but we normally make pizzas on the spur of the moment. I will quickly buy a few ingredients for the topping on the way home from work and then make the dough allowing it to proof for 45-60 minutes. It never occurred to me that if I planned ahead I could actually allow the base to proof in the fridge. Duh!

I’d like to thank Rosa for this fun challenge. If you need more inspiration for pizza toppings please browse through the several great creations from the other Daring Bakers.

Have fun!


All photographs and written content on What's For Lunch, Honey? © 2006-2008 Meeta Khurana unless otherwise indicated. | All rights reserved | Please Ask First

62 comments Continue »

Decadent: Fudge Pralines with Cardamom and Chocolate

| 51 comments
Chocolate Pralines with Cardamom and Chocolate (01) by MeetaK

Diwali for me in Germany is just like any other day in the week. Unlike the glamorous festivities celebrated in India or even those in Qatar, around Diwali I normally become rather wistful. If it was not for my parents, family and friends who write, send cards and call, wishing me a Happy Diwali, why I might even forget this vibrant festival.

Nostalgia often takes over and I often remember those Diwali's I spent with my nana and nani - my grandparents - in Delhi. That was a long time ago. I was just a little girl of 6, 7 or 8 years old, but a few memories are etched in my head like prominent, deep carvings in wood.  I remember my grandfather telling stories to me, my cousins and the neighborhood children and my grandmother handing out bowls of gajar ka halwa - a sweet carrot pudding.

I specifically remember the few days leading up to the Diwali festival. It was always a busy time. My nani would guide us through the busy markets for fresh fruit, vegetables and spices. I can still smell the distinct fragrance of mixed spices in my nostrils as I remember those small narrow shops with the vendors perched on a higher platform and glass aquarium-like chests filled with colorful powdered or whole spices in front of them. It seemed there was no fixed price for anything. When it was decided what was required the bartering would begin. Each vendor shouting down his price and my nani, shaking her head in disagreement. Once a price was reached that both parties found acceptable, the spices were packed in small cone-shaped bags, rolled out of newspapers.

With baskets filled with produce, sweets, spices and decorations we would return back home. My nana would get a scolding from nani for sitting on the veranda and reading the paper - "There is so much to be done!" she would exclaim.

In the kitchen my mum, aunts and the cook were already busy preparing a few of the several sweets that are enjoyed during the Diwali festival. Nani would quickly examine each creation, sneaking a tiny portion of burfi or a jalebi for me, then she would rush out to instruct the househelp of the next chores.

Chocolate Pralines with Cardamom and Chocolate (02) by MeetaK

I would take my loot of warm jalebis and burfi and rush out to nana, who was still on the veranda reading his paper. I would bite off a piece of the syrupy jalebi and give the rest to him. He would smile and from out of his pocket he would pull out a small newspaper parcel. Carefully he would open it to reveal some fresh sooji ka halwa, made with semolina, cardamoms, nuts and raisins, he had saved from his morning trip to the gurudwara.  Sitting on his lap we would share and relish the sweets. As we sat there licking our lips my nani would come rushing out, on her way she would scold my nana. He would just look at me and wink.

I am sure my nana would have loved these pralines. They are soft, fudge-y and literally melt in your fingers. The fragrance of cardamom takes me back instantly to those small narrow spice shops in Delhi. In these pralines, paired with the creamy chocolate ganache, it adds a tinge extrinsic flavor.

Although they are not your typical Indian Diwali-time sweets, my nana was always zealous to do things the "uncommon" way - who knows one might just learn something new or even like it. So with that in my head I am celebrating Diwali with these fudge pralines. 


Fudge Pralines with Cardamom and Chocolate

Ingredients
Printable version of recipe here.

Makes approx. 25 pralines

300g bitter-sweet chocolate, coarsely chopped
90g heavy cream
60g butter, cut into pieces
1 teaspoon ground cardamom
20g bitter-sweet cocoa powder

Method

In a saucepan, bring the cream to a boil. Remove from heat and then add the chocolate and butter. Allow to melt, then stir with a rubber spatula to incorporate.

Add about 1/2 teaspoon ground cardamom. For approx. 3-4 hours place in the refrigerator to cool.

Take the thickened mixture out and leave at room temperature to allow it to soften slightly. With an electric whisk, whisk until smooth and creamy.

Line a cookie sheet with waxed paper.

Using two teaspoons form 25 small heaped moulds on the cookie tray. In a shallow dish mix the cocoa powder with the remaining 1/2 teaspoon cardamom. Gently roll each praline in the cocoa-cardamom powder to coat.

Place them on the cookie tray again and then cool in the refrigerator for an hour.

Note:
If you are giving these as presents, you can place each praline in individual praline paper forms and place in a gift box lined with colored crepe paper. 


Verdict

Chocolate Pralines with Cardamom and Chocolate (03) by MeetaK

As each tiny praline touches your tongue it will start to melt, releasing all its delicious flavor. At first the bitter-sweet cocoa powder with the hint of cardamom, then as the sweet creamy ganache melts, you will experience the zing of the cardamom. It'll have you licking your fingers! They are rich and often 2 or 3 will suffice. But that's OK - as a little goes a long way!

Wishing all my family, friends, blog buddies and readers a peaceful and joyous Diwali!

A box of these are on their way to Srivalli of Cooking 4 All Seasons who is this month's guest hostess for Jihva For Ingredients (JFI). This month's theme is appropriately Festival Treats.

You might like these sweet treats from WFLH:

Matcha Pralines 06 framed Matcha White Chocolate Pralines with Pistachios
HavannaPraline3 Havana Pralines
NougatOrangeTreats2 Nougat Orange Treats

From around the blogs:


Daily Tiffin Reading Tip:

Over at the Daily Tiffin, I have put together a list of scrumptious ideas and recommendations for Diwali sweet treats. Come have a look!


All photographs and written content on What's For Lunch, Honey? © 2006-2008 Meeta Khurana unless otherwise indicated. | All rights reserved | Please Ask First

51 comments Continue »

Spiced Chocolate and Orange Bread

| 52 comments
Spiced Choc Orange Bread (01) by MeetaK

Looking out of the window, I feel elated. We are currently enjoying a gorgeous Indian Summer. The skies are bright blue, without a cloud in sight, a perfect backdrop for the rust, yellow and orange bursts of colors that surround us at this time of year. The sun wraps us in her warm rays and air is crisp.

To enjoy the glory of this Indian Summer we went for a lovely long trek in the Thüringian forest one weekend. The narrow paths that snaked along a mini stream were carpeted in gold and orange. Each time the gentle breeze would rustle the leaves, causing them to snow down around us.

I could not help it – I had to take of my shoes and walk barefooted on this carpet of gold. Soeren, who is all for twirling toes in sand, leaves and dirt, took my cue and untied his shoes. Holding hands we frolicked down the path, splashing every now and then in the stream. Tom laughed at us as we giggled and threw leaves in the air. Soon he too draped his shoes across his shoulders and joined us.

I have never done that before! Walking barefooted in a pile of leaves. For a girl who grew up literally on the beach this was an enchanting experience.

I've often seen Soeren and his friends make a cushiony bed out of leaves outside in the yard. Then they would squeal with glee and dive into the softness. Watching from the window I laugh at their carefree nature.

This time I was the one who jumped gleefully into the leaves. Leaving Soeren watching and laughing at me.  

Spiced Choc Orange Bread (03) by MeetaK

This sweet bread fits perfectly into the effigy of Autumn and rounds off the warm Autumn day in the forest. Pistachios, candied orange and bitter-sweet chocolate are embedded into the cake, kumquat marmalade hugs the top and spices like cardamom, cloves and cinnamon kiss the bread to make this an equally blissful experience.


Spiced Chocolate & Orange Bread

Ingredients
Printable version of recipe here.

400g all-purpose flour
200g + more butter, softened
250g Muscovado sugar
5 eggs
100ml milk
200g bitter-sweet chocolate, coarsely chopped
1/4 teaspoon ground cardamom
1/4 teaspoon ground cloves
1/4 teaspoon ground cinnamon
Pinch of salt
2 teaspoon baking powder
120g pistachios, dry roasted in a pan
50g candied orange, coarsely chopped
5 tablespoons kumquat marmalade, substitute with orange marmalade

Method

Preheat oven to 175 degrees C. Butter a loaf pan (30 cm long).

In a bowl whisk 200g butter, sugar, salt and spices until creamy and pale. Beat in the eggs one at a time then the milk.

Sieve the flour and baking powder into the mixture. Using a rubber spatula incorporate into the batter.

Fold in the candied orange, chocolate and pistachios (reserving 2 tablespoons for the decoration). Fill the batter into the loaf pan. Bake in an oven, second rack from bottom for 65-70 minutes. The bread is done when a toothpick inserted into the middle comes out clean.

Take the cake out, allow to cool then remove from pan. In a saucepan warm the kumquat marmalade until slightly runny. Brush the marmalade on top of the cake and sprinkle with the remaining pistachios. Allow to set.

Serve with coffee. You can enjoy the bread spread with butter and/or some marmalade. 


Verdict

Spiced Choc Orange Bread (02) by Meetak

This bread is perfect for breakfast or in the afternoon as a decadent accompaniment to your cup of coffee. The spices in this cake are preparing me for my Christmas baking but with the sweet candied orange and tart kumquat marmalade it still very much provides an autumnal flair. Soeren took slices of this in his lunchbox everyday for three days in a row. Although it does get a bit dry, the aromas and flavors however intensified as it aged.

Anita of Dessert First is hosting this month's Sugar High Friday. An event created by Jennifer of The Domestic Goddess. Anita chose a very fitting theme for SHF - Spices. I hope she will accept a slice of this from me.

You might like these spiced creations from WFLH:

MangoGingerBread 01 framed Ginger Mango Bread
Peach Goats Cheese Tart 01 framed Peach and Cardamom Goat Cheese Tart
Mufins Exotica04 All-Spice Muffin Exotica

From around the blogs:

Daily Tiffin Reading Tip:


All photographs and written content on What's For Lunch, Honey? © 2006-2008 Meeta Khurana unless otherwise indicated. | All rights reserved | Please Ask First

52 comments Continue »

Weimar: The Onion Market

| 26 comments
Onion Market (013) by MeetaK

Even Goethe praised the Weimar Onion Market as a "famous Market festival". People from all over the world flock to Weimar each year on the second weekend in October to be a part of this festival. This year Weimar celebrated its 355th Onion Market. On three days the city of Weimar turns into a colorful and lively place, where traders sell their wares, musicians give concerts on several stages dotted across the city and food and drinks are plentiful.

Onion Market (01) by MeetaK

Of course it's also always about food. The sweet aroma of caramelized onions, intertwined with the fragrance of spiced bratwurst, garlic wafts through the alleys and the air is honey-coated with a delicious scent of candied almonds and sugared cranberries.

Onion Market (03) Diptych by MeetaK

Who can resist buying small paper bags full of Wasabi peanuts, cranberries covered in yogurt chocolate or chocolate dipped coffee beans.

Onion Market (02) by MeetaK

If an aura of grilled meats makes your tummy grumble, there is certainly something to satisfy the appetite. Marinated meats and of course the famous Thüringian spicy bratwurst with a dollop of hot mustard is sure to satisfy the hungriest tummy-grumbler.

Onion Market (04) Diptych by MeetaK
Onion Market (05) Diptych by MeetaK
Onion Market (06) by MeetaK

After spending a lovely October day with food, music and drink one last ride on the Ferris wheel to enjoy the view above the rooftops of Weimar. 

Onion Market (015) by MeetaK
Onion Market (014) by MeetaK

A fun filled time on a gorgeous Autumn's weekend.

Hope you enjoy the sights and scenes of one of my weekends with the family in Weimar.


All photographs and written content on What's For Lunch, Honey? © 2006-2008 Meeta Khurana unless otherwise indicated. | All rights reserved | Please Ask First

26 comments Continue »

Announcing Monthly Mingle 26: Coffee & Tea

| 23 comments


I'd like to send my fondest regards to Ruth for guest hosting the last Monthly Monthly. If you are looking for a great collection of sides then please do visit Ruth's grand selection of Sensational Sides.

I love the flavor coffee and tea gives when added to a dish or baked goods. It creates a flavor experience unlike many others. This is exactly what I am looking for in this issue of the Monthly Mingle. Use the splendid flavors of your favorite coffee or tea blend in a dish. Bake a cake using spiced tea or create a sauce for your roast using a strong coffee flavor. If you like you can share the blend you used and why you chose it for your creation in your posts.

Send me cakes, sweets, desserts, soups, roasts or ice-creams all flavored with coffee or tea. What I do not want is coffee or tea in its liquid form ;-). Your deadline is November 10th.

Here’s how it works:

  1. Create a dish that fits the theme of “Coffee & Tea” as described above
  2. Post about it on your blog anytime from now until 10 November (entries must be in English, please).
  3. Link to this post and send the details to me (see below).

Once you’ve posted your dish, send an email with “Monthly Mingle: Coffee and Tea” in the subject line to: meetasmingle (at) gmail (dot) com by 10 November with the following information:

  • your name
  • your location
  • the name of your blog and its URL
  • the name of your dish and a link to the relevant post
  • a copy of the main photo of your dish 200px wide (and compressed so that it is below 1MB!)
This is going to be an exciting mingle and I am looking forward to having you over.

If you too would like to guest host the Monthly Mingle in the future drop me an email at blogmeeta [at] gmail [DOT] com (Please note that this email address is different to the one you should send in your entries at.)

See you!


All photographs and written content on What's For Lunch, Honey? © 2006-2008 Meeta Khurana unless otherwise indicated. | All rights reserved | Please Ask First
23 comments Continue »

Creamy Coconut Red Lentils with Couscous

| 39 comments
Red Coconut Lentils (03) by MeetaK

My mind has been wandering lately. There is a lot going on in our lives and my mind seems to be everywhere at the same time. Last week I completed my probation 6 months at work. I got to read the assessment my bosses wrote for me and … well … let’s just say that day my head bloated far too much and I had trouble fitting through doors. ;-)

It’s been a great 6 months and I am really loving every day here at the university. No two days are alike and for my restless Gemini mind I have enough variety to keep my mind active. My former job from home seems so morbid in comparison.

Looking ahead I know 2009 is going to be one of many changes for us. As Tom is wrapping up his thesis, there have been several job offers coming his way. Zurich, Qatar, Abu Dhabi, Dubai, London, Stuttgart are places we could end up in. He has also been offered to stay on at the university here in Weimar. So, you see we have a lot to talk about at home right now.

Weimar – who would have thought that after traveling the world I would feel so comfortable in this small, quaint city? Both Tom and I have found special friends here and Soeren fits into his social network so perfectly. We’d hate to say goodbye to this part of our lives. So Weimar is a very serious contender to all those big cities I mentioned above – because Weimar has somehow become home to us. Initially, when we first moved here we always said it was an intermediate stop in our lives. Just until the PHD is completed. Since then our feelings have changed and we could very well imagine settling down here.

A few of you also know from my last post that this week Soeren is away at his grandparents. So my afternoons have been somehow empty. I have been doing those chores that you put back to the bottom of your list. I cleaned and sorted out the pantry, defrosted the freezer, filed the piles of paperwork and bills and threw away piles of magazines (some from last year!).

The evenings have been quite refreshing this week. Tom, who has been highly strung the last few months, is amazingly relaxed. Generally he would spend 2-3 hours upstairs working on the thesis after Soeren goes to bed, but this week we have been simply spending time together, listening to music, reading and chatting.

So, I am sure you will now understand why I have not been around your blogs lately. While I do miss you all I am relaxing and enjoying spending one on one time with Tom. Enjoying the serenity before things get lively again when Soeren gets back. Inhaling these moments before we dive into the unknown. I'll be around soon. Just need to get my mind settled and focused again.

Dishes like this help us relax and soothes our busy minds. It's a simple serving of red lentils with the added richness of creamy coconut milk accompanied with couscous. We curl up of the sofa with steaming bowls and chat till the late hours. It's useful to make large portions of this because the next day you can add a bit more stock and enjoy it as soup.

Red Coconut Lentils (02) by MeetaK


Coconut Red Lentils

Ingredients
Printable version of recipe here.

200g red lentils
400ml coconut milk
425ml can of tomatoes
2 garlic cloves, finely chopped
1 red chili, de-seeded and finely chopped
2 red onions, finely chopped
1-2 teaspoons turmeric powder
2 tablespoons oil
500ml vegetable stock
Handful of mint leaves, coarsely chopped
Salt and pepper

Method

Heat oil in a large pot. Sauté onions, garlic and chili until soft and translucent. Add the turmeric powder and allow to cook for a minute.

Add lentils, tomatoes, coconut milk and stock and bring the mixture to a boil. Reduce heat and simmer for 20 - 30 minutes until the consistency of the lentils is creamy.

Salt and pepper to taste and finally sprinkle with mint leaves.

Serve hot with couscous.


Verdict

Red Coconut Lentils 01 framed

This is a simple yet flavorful dish. I find it incredibly soothing and comforting. A few wonderful ingredients prepared with a few aromatic spices, creates such a delicious meal. My mother will argue with me for adding coconut milk to the lentils, but I will argue it is the coconut milk that adds a wonderful unique flavor to the lentils. Mint and turmeric simply add a refreshing note rounding the whole dish up.

Sra of When My Soup Came Alive is hosting this session of My legume love affair, an event I have missed taking part in previously much to my regret. The mastermind behind the event is lovely Susan of The Well Seasoned Cook. I hope Sra will accept my humble offerings.

You might like these legumes dishes from WFLH:

Black Bean Chilli 03 framed Black Bean Chili with Saffron Rice and Papaya Guacamole
Chickpea Tajine 04 framed Chickpea Pumpkin Tajine With Coconut Couscous & Coconut Chutney
Hummus04 Minty Hummus

From around the blogs:


Daily Tiffin Reading Tip:


All photographs and written content on What's For Lunch, Honey? © 2006-2008 Meeta Khurana unless otherwise indicated. | All rights reserved | Please Ask First

39 comments Continue »

Sensational Side: Fig and Pear Wraps

| 30 comments
Fig Pear-Bacon wraps (01) by MeetaK

„When the cat’s away, the mice will play!“

In this case:

Cat = Soeren

Mice = Tom + Me

It’s Fall break here and Soeren is away at his grandparents for the whole week. When Tom came back yesterday evening after dropping Soeren off, I was in the kitchen preparing a few nibbles for us to enjoy over a glass of white wine. We looked at each other and as if we knew what the other was thinking high-fived with huge grins on our faces.

It was 8 PM and on a normal Sunday, we would have already had our dinner, packed the school backpack and Soeren would have been in bed. On a normal Sunday.

This, however was not a normal Sunday, this was a Sunday where there was a slight giddy feeling of freedom. The freedom of breaking free from the normal shackles of routine. The freedom of breaking free from being responsible parents for a few days.

Tom turned up the radio as Katy Perry sang “I kissed a girl and liked it!” grabbed me and we danced in the kitchen like two teenagers!

Fig Pear Diptych by MeetaK

Tom opened a bottle of white wine and both of us enjoyed the evening cooking together, talking (without being interrupted) and just eating and drinking for the rest of the evening without having one eye on the clock.

What do I prepare on such evenings? Something light but elegant, like this fig and pear wrap. An easy but flavorful dish, which I love serving with a variety of soft cheeses, but is also a perfect side for poultry, beef, veal, and fish dishes. It would pair up extremely well with the apple glazed duck filets, or make a fruity side to the veal with creamy mushrooms, or even play off with the flavors of the herbs de Provence in the fried fish Provencal.

For us though it was a loaf of fresh baguette, a bottle of wine, a platter of different cheeses and these exquisite wraps.

Fig Pear Bacon Wraps (03) by MeetaK 


Fig, Pear and Bacon Wraps

Ingredients
Printable version of recipe here.

4 small ripe pears, peeled, halved and cores removed
4 ripe figs, halved
200ml white wine
Juice of 1/2 lime
50g sugar
2 tablespoon fig mustard, substitute with any other mustard like Dijon
8 slices bacon
2 tablespoons olive oil
1 tablespoon maple syrup
1 tablespoon dried rosemary
Salt and fresh cracked pepper

Method

Pour the wine, lemon juice and sugar in a large pot. Place the pear halves into the liquid and bring to a boil. Reduce the heat and simmer for 15-20 minutes, until the pears have softened. Remove from heat and allow to cool in the liquid.

Pre-heat the oven to 200 degrees C. Keep an oven proof dish ready.

Spread each fig half with a thin layer of mustard, close with a pear half and then wrap each fruit "sandwich" with a bacon slice. Place in the ovenproof dish.

Drizzle with olive oil and maple syrup, sprinkle with salt, pepper and dried rosemary.

Place in the oven and roast for approx. 15 - 20 minutes.

Serve warm.


Verdict

Fig Pear Bacon Wraps (02) by MeetaK

This was a sensational indulgence. Using pears and figs it is perfect for this time of year. If you should find yourself without the kids one evening, seduce your partner with this delicacy. I simply love dishes like this - fruity, tangy with the mustard and smoky with the bacon. The rosemary adds a delicate highlight rounding the entire dish perfectly.

The Monthly Mingle is over at Ruth's Experiments and we're looking for Sensational Sides. This is my contribution to Ruth's brilliant choice.

You might like these sides from WFLH:

RedCabbagePommegranate 02 Sautéed Red Cabbage with Pomegranate Seeds and Cinnamon
Pumkin Tart 05 Pumpkin & Feta Tart
PumpkinHamSalad 03 Roasted Pumpkin & Mushroom Salad

From around the blogs:


Daily Tiffin Reading Tip:


All photographs and written content on What's For Lunch, Honey? © 2006-2008 Meeta Khurana unless otherwise indicated. | All rights reserved | Please Ask First

30 comments Continue »

Authentic Italy: And the winner is ....

| 7 comments


I am sure many of you have been waiting for the results of the La Cucina Italiana contest. A one year subscription to the glossy La Cucina Italiana magazine to celebrate the launch in the USA.

The rules were simple: Cook an authentic Italian dish, giving an insight to the dish, it's culinary traditions and origins.

I got two lovely ladies to help me judge this contest. Both are connoisseurs of Italian food to say the least. The gorgeous Ivonne and the ravishing Ilva carefully went through each of the submissions and scored in the categories:
  • Authenticity
  • Research
  • How Italian is it?
  • Droolworthy
Each category could receive a maximum of 10 points, making a total of 40 points per judge per submission.

After adding up the points for each judge we had a clear winner!

The prize goes to (drum roll pleas):

Jude of Apple Pie, Patis, Pâté for his Coda all Vaccinara - Roman Braised Oxtail, Butcher’s Style. Besides being a Roman specialty, Jude's candid post explained how the dish is created with easy to follow notes on how to prepare it.

From Ivonne, Ilva and myself we congratulate you and hope you enjoy Italian cooking with your one year subscription!

If you would like to view all of the submissions to the contest please view the La Cucina Contest Submissions list.

Thanks to all of the participants for taking part!


All photographs and written content on What's For Lunch, Honey? © 2006-2008 Meeta Khurana unless otherwise indicated. | All rights reserved | Please Ask First
7 comments Continue »

A Fig Plum Sheet Cake

| 33 comments
Plum Fig Cake (03) by MeetaK

Weimar is beautifully situated in the lush green state of Thuringia. The Free State of Thuringia, as it is officially known, boasts of rolling hills, thick green forests and a lot of cultural history. It's pretty much like living in a vacation spot. For a passionate foodie, this state offers some very famous foods, well known beyond the German borders. I am talking about the perfectly spiced Thuringian Bratwurst (yes I know that bratwurst stand in the bottom picture - it's located at our Farmer's Market in front of the city hall) or those lovely Thuringian potato dumplings. But the most famous type of food Thuringia entices its tourists and residents with, is the unbelievable variety of sheet cakes.

Here in Thuringia sheet cakes are the epicenter of any good bakery. Every housewife has her secret and favorite recipe of preparing a special type of sheet cake. Sheet cakes grace breakfast tables, are the center of focus at the coffee table and party guests are served sweet sheet cakes as desserts after a satisfying meal.

There are two basic types of sheet cakes here - the "dry" and the "wet" variety. Under the "dry" sheet cakes you will find the famous streusel cakes while quark, pudding and fruit provide the moisture in the "wet" types of sheet cakes.

Savory and hearty sheet cakes have a base made out of bread dough and onions and bacon are used as toppings. These sheet cakes are served warm as a quick snack with a cool refreshing glass of beer.

It was in the late 1700s when the Duchess Anna Amalia, often entertained guests like Johann Wolfgang Goethe, Friedrich Schiller, Christoph Martin Wieland and Gottfried Herder in her Wittumspalais in Weimar. At her famous tea parties, her personal cook, François Le Goullon was able to display his incredible talent for cakes and sweets. Besides lovely French pastries these distinguished guests were served some of the most delectable sheet cakes ever. Le Goullon penned down his experience from these tea parties in a book "Der elegante Theetisch", unfortunately available only in German, but an incredibly captivating read.

At these tea parties, the newest works of Goethe, Schiller and co. were read, they discussed the current academic issues, they painted and made music throughout the afternoon and into the late evenings.

Fig Plum Diptych (01) by MeetaK

Sigh! I live in the wrong era.

The magic of Weimar, however captivates me and I love having my own tea parties. After a long rejuvenating walk in the Autumn cool, we return to the warmth of our home, where steaming pots of spiced tea and delicious slices of sheet cake are devoured. Conversations of books, music and the current economic situation dominate our discussions. I record my own thoughts and experience on my blog - hopefully a good read!

Figs and plums adorn my sheet cake. They are laid on a base made of flour, quark and oil producing a tangy and super smooth dough. Finally topped with pistachios and honey this is probably not a traditional Thuringian recipe but it sure is a delicious way to enjoy a sheet cake.

Plum Fig Cake (02) by MeetaK

Fig Plum Sheet Cake

Ingredients
Printable version of recipe here.

The Dough

300g quark
12 tablespoons oil
500g flour
150g fine sugar
2 eggs
3 teaspoons baking powder

The Topping

1 kg plums, pitted and quartered
5-7 ripe figs, quartered
2 tablespoons brown sugar
3 tablespoons lemon juice
50 - 60g pistachios, coarsely chopped
5 tablespoons Acacia honey

Method

In a large bowl rashly mix all the ingredients for the dough with the hook attachment of your hand or stand mixer into a smooth dough. Allow to rest for 15 - 20 minutes.

Line a baking sheet 40 x 25 cm) with baking paper. Pre-heat the oven to 190 degrees C.

In the meantime macerate the figs in lemon juice.

On a floured countertop roll out the dough to the size of the baking sheet. Lift the dough and place on the baking sheet. Using your fingers spread out to the edges of the sheet.

Lay the fig and plum quarters on the dough and sprinkle with brown sugar. Bake the cake for 45 minutes on the bottom rack of your oven. Approx. 15 minutes before the end of the baking time add the pistachios, then bake for the final 15 minutes.

Take the cake out of the oven and allow to slightly cool, then drizzle the honey over the fruit. Cut into squares and serve with vanilla flavored whipped cream.


Verdict

Plum Fig Cake (04) by MeetaK

I do not have the famous four - Goethe, Schiller, Herder and Wieland - over for tea and cake, but something tells me they might just take a liking to this cake.

The quark-oil dough is a popular type of dough prepared here in Germany. The quark keeps the dough moist and the oil gives it a silken texture. The fruit - well figs and plums are the hottest pairing for me this autumn. The sugar sprinkled on top of the fruit caramelizes in the oven, the juices become syrupy and soak into the dough spreading the fruity flavor throughout the dough. Finally - pistachios not only add that extravagant flair of color but by roasting in the oven for the last 15 minutes it brings out the sensational nutty flavor. Honey adds an extra touch of elegance.

May I offer you some tea with your slice?

This weekend Weimar is having its annual Onion Market festival. Every year a city run accompanies the festival. Although Tom runs every year, this year is special - Soeren will be running for the first time. He'll be doing the 600 m run and we are all excited. Wish us luck!

You might like these cakes from WFLH:

ChocolateCake01 Chocoholic's Chocolate Cake
FruitCake 04 x Dundee Fruit Cake
CranberryUpsideDown3 Cranberry Upside-Downer
Persimmon Spice Cake - Slice Persimmon Spice Cake

From around the blogs:


Daily Tiffin Reading Tip:


All photographs and written content on What's For Lunch, Honey? © 2006-2008 Meeta Khurana unless otherwise indicated. | All rights reserved | Please Ask First

33 comments Continue »