Ho ho ho and getting into that Christmas vibe here! Every weekend I have been taking out a few select favourite decoration pieces, adorning the various corners of the house..

Ho ho ho and getting into that Christmas vibe here! Every weekend I have been taking out a few select favourite decoration pieces, adorning the various corners of the house..

The last thing I expected to really get hooked on in terms of food, when I first moved to Germany, was bread. Having lived in many countries I was used to a great variety of bread, mostly flatbreads. In my arrogance - or call it ignorance - I was sure that while Germany had some great bread-types – think of the pumpernickel, others were overrated – for me the pretzel!
Several years ago when we lived in Leipzig we had a Christmas ritual. A few weeks before Christmas we would get together with friends and spend a very merry evening together making Christmas wreaths and decorations, drinking Glühwein, listening to Christmas carols and then attempting to cook a 3 course meal. We were a fairly large group of friends and the evening usually led to all sort of hilarious activities and memorable memories.
The German in me lives for the impressive variety of breads available to me. My Indian-self craves the rice with almost every meal and the Italian-lover me, is captivated with the pastas and risotto and the kid in me could live off creamy mashed potatoes for quite a few days. Over the year my intake of simple carbohydrates adds up to extreme levels.
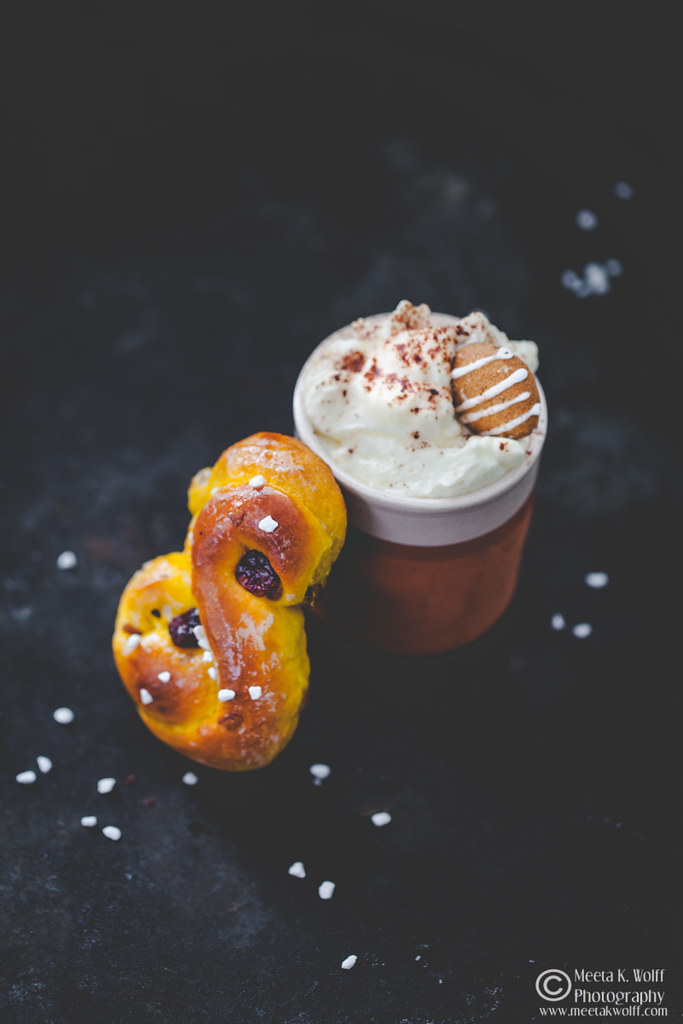
There is something very special about the Nordic baking craft. It lies in the sheer simplicity of mixing basic ingredients to create something so enticingly good. I am particularly enamored by their yeasty breads and buns, probably because of the liberal use of warming spices like cardamom, cinnamon and even saffron. There are no frills, no frosting or glazing. It is back to the basic of yeast, flour, eggs and co. … and of course a good dose of cardamom.
 by MeetaK")
Surprised to see me back doing the Daring Bakers' challenge so soon? Especially since in my last challenge post I announced it would be my last till October! If you do not know yet then let me tell you that although we packed, sold and sorted out a lot of our stuff for the anticipated move, we are not moving anymore. Due to several issues in the project, Tom was supposed to work on in Doha, we decided that the perspective initially offered to him had changed too much and Tom has oriented himself elsewhere.
 by MeetaK")
After the delicious and rich December challenge of chocolate and coconut French Yule Log, January's challenge was almost like a much needed detox! We've known the Daring Bakers' challenges to be rich, lush and delicious in the past but trust me this month's challenge was for me - God sent!
 by MeetaK")
The countdown to Christmas, here in Germany, starts with the beginning of Advent. Soeren especially loves this time of year. For him the magic of Christmas chimes in on the first of December with the opening of the first door on his Advent’s calendar.
 by MeetaK")
Hope you will allow these thoughts.
It's supposed to be a time for peace, family, love and gratitude. But there is hate and violence instead. Bombay is my birth city and while I left a long time ago the bond between us is special. It's like that first love or that first kiss - you never forget it.
The Oberoi Hotel - it's in my veins. My dad was part of the team that built that hotel. A few days old, my mother brought me to my first "home" in a suite on the 20th floor. Pictures of my first birthday, celebrated at the Oberoi Bombay, adorn the walls in my parents home.
I remember the summer vacations in India. Now a teenage girl, I was a part of a chic Bombay crowd, who fondly teased me about my American accent when I spoke Hindi. For a few weeks in the summer I reveled in this boisterous city. I won't pretend that I know the city - I've been gone far too long - but my god! My heart bleeds as I see my first love being ripped apart like this.
I am not in Bombay but each gunshot, each blast I hear blasting from the speakers of our television makes me cringe. I feel anger at these evil people with no souls or remorse. And ask "Why?"
Thank you for allowing me to vent and share my thoughts.
I am glad I have this space, relieved that I can come here and take my mind off things or speak my mind if I choose to.
My distraction right now is this month's Daring Bakers challenge. Dolores of Chronicles in Culinary Curiosity was our hostess this month with Alex and Jenny helping out. The recipe of choice was a signature cake by Shuna Fish Lydon of Eggbeater. The caramel cake intrigued me as I have been on a caramel flavor high lately.
 by MeetaK")
The rules were simple: make the cake and the caramel butter frosting. Well those who know me will quickly realize where my predicament in this lies - the butter frosting. I do not mind frosting but will avoid it where ever I can. I prefer enjoying cakes and co. in their rustic form without the frills of frosting.
I made the cake last weekend and having skimmed past a few issues over at the members area of the Daring Bakers Kitchen, I picked up that there were some issues with the cake and that especially the frosting was a bit on the sweet side.
Initially, I thought I would leave the frosting out - make an excuse of being abducted by aliens right in the middle of the cake! But hey c'mon it's not my style. ;-)
 by MeetaK")
The entire challenge took me three days to make. I was a bit pressed for time this month and had to fit the elements of the cake as time was rationed out to me. So Friday evening found me making the caramel syrup. It had started snowing over the weekend and Soeren was anxious to go out. Snow ball fights and snowmen later I got back to the challenge on Sunday.
The cake itself was quite simple. I decided to keep the flavor of the cake hundred percent caramel. We had the choice of doing our flavor combinations, but I decided this was going to be all about caramel.
After reading Shuna's comment:
"But I will say this about flavours: you will hide and lose the subtlety of the caramel flavour in the cake and that's what this cake is about."
I knew I would be following the recipe to a T, without the addition of extra flavors.
After tasting the cake with a simple drizzling of the caramel syrup, I re-considered the alien abduction excuse. The cake was good - darned good, we all did not need the frosting.
be MeetaK")
Monday and curiosity got the better of me. I examined the frosting recipe and found the brown butter concept appealing. I still had my special jar cakes and half of the whole cake, so I reduced the frosting recipe in half and decided to satisfy my curiosity.
I was glad I did give the frosting a second chance because it was quite good, sweet but good. I used a limited amount of frosting so it was not overpowering, but a delicacy.
 by MeetaK")
This month the team over at the Daily Tiffin are hosting the Monthly Mingle. We are all looking forward and eagerly awaiting your ideas and creations to this session's theme - Low-Sugar Treats. Come on over and share your healthy treats.
The deadline is December 8th, 2008. See you there.
Recipe: Caramel Cake with Caramelized Butter Frosting
(recipe courtesy of Shuna Fish Lydon - Caramel Cake)
Printable version of recipe here.
CARAMEL CAKE
142g unsalted butter at room temperature
280g granulated sugar
½ tsp/2.5 ml kosher salt
80ml Caramel Syrup (see recipe below)
2 each eggs, at room temperature
splash vanilla extract
286g all-purpose flour
1/2 teaspoon/2.5ml baking powder
240ml milk, at room temperature
Method
Preheat oven to 350F/176c/gas mark 4.Butter one tall (5-6/2 – 2.5 inch deep) 23cm/9-inch cake pan.
In the bowl of a stand mixer fitted with a paddle attachment, cream butter until smooth. Add sugar and salt & cream until light and fluffy.
Slowly pour room temperature caramel syrup into bowl. Scrape down bowl and increase speed. Add eggs/vanilla extract a little at a time, mixing well after each addition. Scrape down bowl again, beat mixture until light and uniform.
Sift flour and baking powder.
Turn mixer to lowest speed, and add one third of the dry ingredients. When incorporated, add half of the milk, a little at a time. Add another third of the dry ingredients, then the other half of the milk and finish with the dry ingredients.Note: This is called the dry, wet, dry, wet, dry method in cake making. It is often employed when there is a high proportion of liquid in the batter.'
Take off mixer and by hand, use a spatula to do a few last folds, making sure batter is uniform. Turn batter into prepared cake pan.
Place cake pan on cookie sheet or 1/2 sheet pan. Set first timer for 30 minutes, rotate pan and set timer for another 15-20 minutes. Your own oven will set the pace. Bake until sides pull away from the pan and skewer inserted in middle comes out clean. Cool cake completely before icing it.
Cake will keep for three days outside of the refrigerator.
CARAMEL SYRUP
450g cups sugar
120ml cup water
240ml cup water (for "stopping")Method
In a small stainless steel saucepan, with tall sides, mix water and sugar until mixture feels like wet sand. Brush down any stray sugar crystals with wet pastry brush.Turn on heat to highest flame. Cook until smoking slightly: dark amber.
When color is achieved, very carefully pour in one cup of water. Caramel will jump and sputter about! It is very dangerous, so have long sleeves on and be prepared to step back.
Whisk over medium heat until it has reduced slightly and feels sticky between two fingers. Wait for it to cool on a spoon before touching it.
Note: For safety reasons, have ready a bowl of ice water to plunge your hands into if any caramel should land on your skin.
CARAMELIZED BUTTER FROSTING12 tablespoons unsalted butter
454g confectioner’s sugar/icing sugar, sifted
60-90 ml heavy/double cream
10ml vanilla extract
30-60 ml caramel syrup
Kosher or sea salt to tasteMethod
Cook butter until brown. Pour through a fine meshed sieve into a heatproof bowl, set aside to cool.Pour cooled brown butter into mixer bowl.
In a stand mixer fitted with a paddle or whisk attachment, add confectioner's sugar a little at a time. When mixture looks too chunky to take any more, add a bit of cream and or caramel syrup. Repeat until mixture looks smooth and all confectioner's sugar has been incorporated. Add salt to taste.
Note: Caramelized butter frosting will keep in fridge for up to a month.
To smooth out from cold, microwave a bit, then mix with paddle attachment until smooth and light
Verdict
 by MeetaK")
I loved the nuances of gold and rust this cake took as it baked in the oven. Cutting it was pure pleasure. It was spongy and moist - just how a cake should be, I thought. Although, we liked the cake as it is, the caramelized butter frosting in moderation gave it a creamy complementing flavor. It was a very different cake flavor-wise. I browned my caramel quite deeply, which gave the entire cake an intense caramel taste. It was exquisite.
Would I make this again?
This was a different kind of cake as the ones we have been doing in the Daring Bakers group. In comparison the caramel cake looks rather plain - but a bite of this caramel delight was so incredibly good that no layer cake can stand up to it. It's versatile too - if one wants - it can be easily be transformed into a layer cake. The cake rises very well and when cut horizontally one could add a layer of the frosting in between the cake. However, I liked it in it's simplest and purest form and will be making this again.
What did I learn from this challenge?
I did not experience any issues with the cake, the syrup or the frosting. The recipe is easy to follow and very straightforward, giving great results. The browning of the butter for the frosting was something new to me and I think if I ever wanted frills on my cakes I will use this method again.
I thank all three hosts for this month's challenge. My Daring Bakers colleagues have made several variations of this cake so please do visit them for more ideas and inspiration.
You might like these past Daring Baker creations from WFLH:
 |  |  |
| Yule Log - Bûche de Noël | Perfect Party Cake | Opera Cake |
The Daring Bakers celebrated their second anniversary this month and I for one am glad to be a part of this exceptional group of talented bakers. I've learned so much in the past year and a half. My biggest thanks goes to Ivonne for convincing me to join the group and to Lisa for creating the Daring Bakers legacy and for all their hard work.
All photographs and written content on What's For Lunch, Honey? © 2006-2008 Meeta Khurana unless otherwise indicated. | All rights reserved | Please Ask First
 by MeetaK")
None other than your's truly was hosting this month's Daring Bakers challenge! So you can imagine my nervousness and my excitement all rolled up in one. I had two very handsome and talented helping hands though. Those hands belonged to the exceptional Tony of Olive Juice.
I pretty much was sure I was going to get the over a million Daring Bakers (slight exaggeration there) to make a recipe from the sugar daddy himself - Pierre Hermé. I was just stuck between macarons or éclairs.
In the end it was the éclairs that won, simply because these sinfully good French pastries brought back several wonderful memories of growing up in hotels. I remember sneaking into the side of the pastry kitchen and then stealing the freshly made éclairs from the pastry chef - who always seemed to place a tray full of these just in the right corner for me to grab a few. And there was always a glass of milk next to the tray. Funny don't you think?
When I told Tony about my decision he seemed really excited too so we both made a test batch of these in early July and knew straight away this was to be the August challenge. We decided on the modifications for the challenge. Under the motto - Culinary Liberty For All, Tony and I thought we should give enough leeway for creativity. After all my favorite challenges were always those which allowed me to use my own ideas.
What’s the point in cooking if not to cook what YOU want to eat?
The possibilities for éclairs are endless. So we attached just a couple of general guidelines for eclair month at the Daring Bakers.
With that in mind the challenge for August was opened.
 by MeetaK")
I knew there were many advanced bakers in the group who had made éclairs before, but with the allowed modifications I was hoping to allow them more creativity and leeway to try new flavor combinations. For the others who had never made éclairs before I knew this was going to be a challenge they might enjoy.
Éclairs consist of 3 elements:
Although I have made all the elements of the éclairs individually in previous challenges, I had never actually made éclairs. So it was going to be challenging and fun for me too.
For my first batch of éclairs I used mint flavored chocolate with 70% cacao. I love this pastry cream and have often made it to fill several pastries and cakes, like the chocolate crepe cake and the Danish braid. This time I experimented with a Brazilian mint chocolate bar. The results were sensational and I really loved the flavor it gave the entire éclairs.
My second batch were made 100% to the recipe given here. Pure, perfect and pleasurable. Nothing like purely chocolate éclairs!
Pierre Hermé’s Chocolate Éclairs
Recipe from Chocolate Desserts by Pierre Hermé
(makes 20-24 Éclairs)
Printable version of recipe here.
- Cream Puff Dough (see below for recipe), fresh and still warm
- Preheat your oven to 375 degrees F (190 degrees C). Divide the oven into thirds by positioning the racks in the upper and lower half of the oven. Line two baking sheets with waxed or parchment paper.
- Fill a large pastry bag fitted with a 2/3 (2cm) plain tip nozzle with the warm cream puff dough.
Pipe the dough onto the baking sheets in long, 4 to 41/2 inches (about 11 cm) chubby fingers.
Leave about 2 inches (5 cm) space in between each dough strip to allow them room to puff.
The dough should give you enough to pipe 20-24 éclairs.
- Slide both the baking sheets into the oven and bake for 7 minutes. After the 7 minutes, slip the handle of a wooden spoon into the door to keep in ajar. When the éclairs have been in the oven for a total of 12 minutes, rotate the sheets top to bottom and front to back. Continue baking for a further 8 minutes or until the éclairs are puffed, golden and firm. The total baking time should be approximately 20 minutes.
Notes:
- The éclairs can be kept in a cool, dry place for several hours before filling.
Assembling the éclairs:
- Chocolate glaze (see below for recipe)
- Chocolate pastry cream (see below for recipe)
- Slice the éclairs horizontally, using a serrated knife and a gently sawing motion. Set aside the bottoms and place the tops on a rack over a piece of parchment paper.
- The glaze should be barely warm to the touch (between 95 – 104 degrees F or 35 – 40 degrees C, as measured on an instant read thermometer). Spread the glaze over the tops of the éclairs using a metal icing spatula. Allow the tops to set and in the meantime fill the bottoms with the pastry cream.
- Pipe or spoon the pastry cream into the bottoms of the éclairs. Make sure you fill the bottoms with enough cream to mound above the pastry. Place the glazed tops onto the pastry cream and wriggle gently to settle them.
Notes:
- If you have chilled your chocolate glaze, reheat by placing it in a bowl over simmering water, stirring it gently with a wooden spoon. Do not stir too vigorously as you do not want to create bubbles.
- The éclairs should be served as soon as they have been filled.
Cream Puff Dough
(makes 20-24 Éclairs)
- ½ cup (125g) whole milk
- ½ cup (125g) water
- 1 stick (4 ounces; 115g) unsalted butter, cut into 8 pieces
- ¼ teaspoon sugar
- ¼ teaspoon salt
- 1 cup (140g) all-purpose flour
- 5 large eggs, at room temperature
- In a heavy bottomed medium saucepan, bring the milk, water, butter, sugar and salt to the boil.
- Once the mixture is at a rolling boil, add all of the flour at once, reduce the heat to medium and start to stir the mixture vigorously with a wooden spoon. The dough comes together very quickly. Do not worry if a slight crust forms at the bottom of the pan, it’s supposed to. You need to carry on stirring for a further 2-3 minutes to dry the dough. After this time the dough will be very soft and smooth.
- Transfer the dough into a bowl of a mixer fitted with the paddle attachment, or using your handmixer or if you still have the energy, continue by hand. Add the eggs one at a time, beating after each egg has been added to incorporate it into the dough.
You will notice that after you have added the first egg, the dough will separate, once again do not worry. As you keep working the dough, it will come back all together again by the time you have added the third egg. In the end the dough should be thick and shiny and when lifted it should fall back into the bowl in a ribbon.
- The dough should be still warm. It is now ready to be used for the éclairs as directed above.
Notes:
- Once the dough is made you need to shape it immediately.
- You can pipe the dough and the freeze it. Simply pipe the dough onto parchment-lined baking sheets and slide the sheets into the freezer. Once the dough is completely frozen, transfer the piped shapes into freezer bags. They can be kept in the freezer for up to a month.
Chocolate Pastry Cream
- 2 cups (500g) whole milk
- 4 large egg yolks
- 6 tbsp (75g) sugar
- 3 tablespoons cornstarch, sifted
- 7 oz (200g) bittersweet chocolate, preferably Valrhona Guanaja, melted
- 2½ tbsp (1¼ oz: 40g) unsalted butter, at room temperature
- In a small saucepan, bring the milk to a boil. In the meantime, combine the yolks, sugar and cornstarch together and whisk in a heavy‐bottomed saucepan.
- Once the milk has reached a boil, temper the yolks by whisking a couple spoonfuls of the hot milk into the yolk mixture.Continue whisking and slowly pour the rest of the milk into the tempered yolk mixture.
- Strain the mixture back into the saucepan to remove any egg that may have scrambled. Place the pan over medium heat and whisk vigorously (without stop) until the mixture returns to a boil. Keep whisking vigorously for 1 to 2 more minutes (still over medium heat).Stir in the melted chocolate and then remove the pan from the heat.
- Scrape the pastry cream into a small bowl and set it in an ice‐water bath to stop the cooking process. Make sure to continue stirring the mixture at this point so that it remains smooth.
- Once the cream has reached a temperature of 140 F remove from the ice‐water bath and stir in the butter in three or four installments. Return the cream to the ice‐water bath to continue cooling, stirring occasionally, until it has completely cooled. The cream is now ready to use or store in the fridge.
Notes:
- The pastry cream can be made 2‐3 days in advance and stored in the refrigerator.
- In order to avoid a skin forming on the pastry cream, cover with plastic wrap pressed onto the cream.
- Tempering the eggs raises the temperature of the eggs slowly so that they do not scramble.
Chocolate Glaze
(makes 1 cup or 300g)
- 1/3 cup (80g) heavy cream
- 3½ oz (100g) bittersweet chocolate, finely chopped
- 4 tsp (20 g) unsalted butter, cut into 4 pieces, at room temperature
- 7 tbsp (110 g) Chocolate Sauce (recipe below), warm or at room temperature
- In a small saucepan, bring the heavy cream to a boil. Remove from the heat and slowly begin to add the chocolate, stirring with a wooden spoon or spatula.
- Stirring gently, stir in the butter, piece by piece followed by the chocolate sauce.
Notes:
- If the chocolate glaze is too cool (i.e. not liquid enough) you may heat it briefly in the microwave or over a double boiler. A double boiler is basically a bowl sitting over (not touching) simmering water.
- It is best to glaze the eclairs after the glaze is made, but if you are pressed for time, you can make the glaze a couple days ahead of time, store it in the fridge and bring it up to the proper temperature (95 to 104 F) when ready to glaze.
Chocolate Sauce
(makes 1½ cups or 525 g)
- 4½ oz (130 g) bittersweet chocolate, finely chopped
- 1 cup (250 g) water
- ½ cup (125 g) crème fraîche, or heavy cream
- 1/3 cup (70 g) sugar
- Place all the ingredients into a heavy‐bottomed saucepan and bring to a boil, making sure to stir constantly. Then reduce the heat to low and continue stirring with a wooden spoon until the sauce thickens.
- It may take 10‐15 minutes for the sauce to thicken, but you will know when it is done when it coats the back of your spoon.
Notes:
- You can make this sauce ahead of time and store it in the refrigerator for two weeks. Reheat the sauce in a microwave oven or a double boiler before using.
- This sauce is also great for cakes, ice-cream and tarts.
One of the huge plus points about being in such a group is that there are so many experienced bakers out there, who are kind enough to give us a tip or two. The Daring Bakers Forum was full of extremely useful tips and tricks for this challenge. So I thought I would share them with you too. I thank everyone for sharing all your ideas, tips and tricks for this challenge.
Éclairs 101: Tips & Tricks: (Scroll up for recipe)
Verdict
When I first made these in July, I had the same problems as many of my fellow DBs. In the oven they puffed up beautifully and looked like a million dollars. However as soon as I took them out of the oven, they flattened on me miserably. But thanks to the tips I shared with you above, my second batch were a real success. These were a decadent treat. Not only did they bring back memories, I also spent a great afternoon with Soeren who was my eager helper and spoon licker for this challenge. Tom is a chocolate kind of guy and has a bad sweet tooth. As my challenge taster, these pastries were his favorite to date. I served these at a little cocktail party and really had a tough time convincing my guests that these were homemade.
Would I make this again?
Yes! I am proud that I managed these. Because of the fact I love éclairs I now do not have to wait to visit my parents in Dubai to enjoy hotel style éclairs. I can make them in my own kitchen.
What did I learn from this challenge?
Many things - like all those wonderful tips mentioned above. What it takes to make the perfect éclair shells and do's and dont's of this delicate pastry.
At this stage I really have to thank two lovely ladies, Natalie of Gluten A Go Go and Helen of Tartelette, who went out of the way to help Tony and myself answer tricky questions and give their expertise advice on how to make the best éclairs.
Phew! I cannot believe I just hosted my own Daring Baker challenge! If anyone had told me this before my first challenge I would have given them a very funny look indeed! I hope that everyone who completed the challenge enjoyed it as much as I did. I also wish everyone who makes these delectable chocolate pastries good luck and enjoy a piece of heaven!
You might find these pastry and cake "How Tos" helpful too:
If you are looking for more helpful tips and tricks, you will find several other "how tos" in the sidebar category The Know Hows of Food under the section How To...
All photographs and written content on What's For Lunch, Honey? © 2006-2008 Meeta Khurana unless otherwise indicated. | All rights reserved | Please Ask First
 by MeetaK")
It's challenges like this I truly love. Flaky pastry filled with a sensual filling of chocolate pastry cream and tart raspberries. This month the adorable Kelly of Sass & Veracity and brilliant Ben of What's Cooking? got us turning and flipping over a buttery layer of Danish pastry.
I have to say this - I am glad that I have been in the Daring Baker group for over a year now, because if I was not I would have been doing one of my Voodoo dances I normally save for these kinds of challenges!
I remember my second challenge had me completely stressed. Who remembers the Gateau Saint Honoré? This challenge had me biting my finger nails and hitting my head against my trusted rolling pin for deciding to join a baking group. My second challenge, and I had to conquer 3 (out of 4) tough components that makes up the great Gateau! All 3 of which I had never made prior to that challenge!
Yes - puff pastry was one of those components. Looking back I kind of giggle now - because anyone who has made their own puff pastry will nod their heads in agreement when I say - one never goes back to the store-bought stuff. Homemade puff pastry is a lot of work - but it is so rewarding that even the best store-bought pastry cannot compete.
Since that challenge, I do often make my own puff pastry. I make huge batches and freeze them and am always surprised how fast it goes. Knowing that there is lovely homemade puff pastry in the freezer only makes me want to make more delicious pastries with it. It's great to have around - defrost overnight, smother with Nutella or jam in the morning and bake for a few minutes and we have a lovely crispy breakfast or snack for Soeren's lunchbox.
When this month's challenge was announced, surprisingly I was not phased out! Kelly and Ben chose the Danish Braid from from Sherry Yard’s The Secrets of Baking.
Danish dough belongs to the family of butter-laminated or layered dough, with puff pastry being the ultimate. While the Danish dough is sweet and is yeast-leavened, puff pastry is not. The process of making Danish dough is less complex than that of puff pastry, but equally as important to achieve best results, and a great starting place to begin to learn about laminated doughs in general. Danish dough is extremely versatile, and once made can be used for a variety of baked goods. The possibilities are endless.
The guidelines for the challenge were quite easy:
 by MeetaK")
We had a few choices to modify the recipe:
For my braids I chose to make a rich chocolate pastry cream using the recipe from my sugar daddy ;-) and paired it with the fruity freshness of raspberries. The pastry cream is something I make very often. It's simply exquisite and a breeze to whip up. Often I will make the pastry cream as a dessert and serve it as the world's best chocolate pudding! And when I do - I am the World's best mummy!
I left out the orange zest in the dough but kept the cardamom, as I find chocolate and raspberries pair well with cardamom. You will find the recipe here for the chocolate pastry cream as I made it to fill my braid, however, I have also included the recipe for the original filling - Apple filling. This way if you do decide to make the full amount of the dough you can give both fillings try.
You will be seeing plenty of Danish braids with several unique and excellent filling ideas today. So I hope you enjoy the Daring Bakers June challenge across the blogesphere.
Danish Braid
from Sherry Yard's The Secret of Baking
Printable version of recipe here.
Terminology:
 by MeetaK")
DANISH DOUGH
Makes 2-1/2 pounds dough
Ingredients
For the dough (Detrempe)
1 ounce fresh yeast or 1 tablespoon active dry yeast
1/2 cup whole milk
1/3 cup sugar
Zest of 1 orange, finely grated
3/4 teaspoon ground cardamom
1-1/2 teaspoons vanilla extract
1/2 vanilla bean, split and scraped
2 large eggs, chilled
1/4 cup fresh orange juice
3-1/4 cups all-purpose flour
1 teaspoon salt
For the butter block (Beurrage)
1/2 pound (2 sticks) cold unsalted butter
1/4 cup all-purpose flour
Dough
Using a standing mixer: Combine yeast and milk in the bowl of a mixer fitted with the paddle attachment and mix on low speed. Slowly add sugar, orange zest, cardamom, vanilla extract, vanilla seeds, eggs, and orange juice. Mix well.
Change to the dough hook and add the salt with the flour, 1 cup at a time, increasing speed to medium as the flour is incorporated. Knead the dough for about 5 minutes, or until smooth. You may need to add a little more flour if it is sticky. Transfer dough to a lightly floured baking sheet and cover with plastic wrap. Refrigerate for 30 minutes.
Without a standing mixer: Combine yeast and milk in a bowl with a hand mixer on low speed or a whisk. Add sugar, orange zest, cardamom, vanilla extract, vanilla seeds, eggs, and orange juice and mix well. Sift flour and salt on your working surface and make a fountain. Make sure that the “walls” of your fountain are thick and even. Pour the liquid in the middle of the fountain.
With your fingertips, mix the liquid and the flour starting from the middle of the fountain, slowly working towards the edges. When the ingredients have been incorporated start kneading the dough with the heel of your hands until it becomes smooth and easy to work with, around 5 to 7 minutes. You might need to add more flour if the dough is sticky.
Butter Block
Combine butter and flour in the bowl of a mixer fitted with a paddle attachment and beat on medium speed for 1 minute. Scrape down the sides of the bowl and the paddle and then beat for 1 minute more, or until smooth and lump free. Set aside at room temperature.
After the detrempe has chilled 30 minutes, turn it out onto a lightly floured surface. Roll the dough into a rectangle approximately 18 x 13 inches and ¼ inch thick. The dough may be sticky, so keep dusting it lightly with flour. Spread the butter evenly over the center and right thirds of the dough. Fold the left edge of the detrempe to the right, covering half of the butter. Fold the right third of the rectangle over the center third. The first turn has now been completed. Mark the dough by poking it with your finger to keep track of your turns, or use a sticky and keep a tally. Place the dough on a baking sheet, wrap it in plastic wrap, and refrigerate for 30 minutes.
Place the dough lengthwise on a floured work surface. The open ends should be to your right and left. Roll the dough into another approximately 13 x 18 inch, ¼-inch-thick rectangle. Again, fold the left third of the rectangle over the center third and the right third over the center third. No additional butter will be added as it is already in the dough. The second turn has now been completed. Refrigerate the dough for 30 minutes.
Roll out, turn, and refrigerate the dough two more times, for a total of four single turns. Make sure you are keeping track of your turns. Refrigerate the dough after the final turn for at least 5 hours or overnight. The Danish dough is now ready to be used.
Storing: If you will not be using the dough within 24 hours, freeze it. To do this, roll the dough out to about 1 inch in thickness, wrap tightly in plastic wrap, and freeze. Defrost the dough slowly in the refrigerator for easiest handling. Danish dough will keep in the freezer for up to 1 month.
FILLING
 by MeetaK")
Chocolate Pastry Cream & Raspberries
Chocolate pastry cream adapted from Chocolate Desserts by Pierre Hermé's written by Dorie Greenspan
Makes 900 g of pastry cream
Ingredients
2 cups whole milk
4 large egg yolks
6 tablespoons sugar
3 tablespoons cornstarch, sifted
200 g bittersweet chocolate, melted
40 g unsalted butter, at room temperature
250 g fresh raspberries
Preparation
Fill a large bowl with cold water and ice cubes. Set aside a smaller bowl that will fit inside the ice bath and hold the pastry cream. Also set aside a fine meshed strainer.
In a small saucepan bring the milk to the boil. In the meantime, whisk the egg yolks, sugar and cornstarch together in another medium sized saucepan.
Once the milk is hot you will need to temper the egg mixture by adding tablespoonfuls of the milk to the egg mixture, whisking all the while. Still whisking, once the egg mixture starts to warm up, slowly pour in the rest of the milk.
Strain the mixture into the saucepan and heat over a medium heat. Whisking vigorously, without stopping, bring the mixture to a boil. Keep the mixture at a boil - whisking with all your might - for 1 to 2 minutes.
Still over the heat, whisk in the melted chocolate. Remove from heat and scrape the pastry cream into the small bowl.
The pastry cream should be thick, smooth and without any lumps.
Set the bowl holding the pastry cream in the ice bath, stirring frequently to keep the mixture smooth. Cool the pastry cream to 60 degrees C, then remove from the once bath and stir in the butter in three or four additions. Return the cream to the ice bath and leave it there until it has completely cooled.
Storing: Covered tightly with plastic wrap and pressing the plastic against the cream's surface to create and airtight seal, the pastry cream will remain fresh in the refrigerator for 2 days.
Leftovers: Use the rest as a dessert on it's own scattered with fresh raspberries and pistachios. Or use it to make other chocolate pastries.
Apple Filling
Makes enough for two braids
Ingredients
4 Fuji or other apples, peeled, cored, and cut into ¼-inch pieces
1/2 cup sugar
1 tsp. ground cinnamon
1/2 vanilla bean, split and scraped
1/4 cup fresh lemon juice
4 tablespoons unsalted butter
Toss all ingredients except butter in a large bowl. Melt the butter in a sauté pan over medium heat until slightly nutty in color, about 6 - 8 minutes. Then add the apple mixture and sauté until apples are softened and caramelized, 10 to 15 minutes.
If you’ve chosen Fujis, the apples will be caramelized, but have still retained their shape. Pour the cooked apples onto a baking sheet to cool completely before forming the braid. (If making ahead, cool to room temperature, seal, and refrigerate.) They will cool faster when spread in a thin layer over the surface of the sheet.
Storing: After they have cooled, the filling can be stored in the refrigerator for up to 3 days.
Leftovers: The filling can be used as an ice cream topping, for muffins, cheesecake, or other pastries.
Assembling the Danish Braid
Makes enough for 2 large braids
 by MeetaK")
Line a baking sheet with a silicone mat or parchment paper. On a lightly floured surface, roll the Danish Dough into a 15 x 20-inch rectangle, ¼ inch thick. If the dough seems elastic and shrinks back when rolled, let it rest for a few minutes, then roll again. Place the dough on the baking sheet.
Along one long side of the pastry make parallel, 5-inch-long cuts with a knife or rolling pastry wheel, each about 1 inch apart. Repeat on the opposite side, making sure to line up the cuts with those you’ve already made.
Spoon the filling you’ve chosen to fill your braid down the center of the rectangle. If using the chocolate pastry cream scatter the raspberries over the pastry cream.
Starting with the top and bottom “flaps”, fold the top flap down over the filling to cover. Next, fold the bottom “flap” up to cover filling. This helps keep the braid neat and helps to hold in the filling. Now begin folding the cut side strips of dough over the filling, alternating first left, then right, left, right, until finished. Trim any excess dough and tuck in the ends.
Whisk together the whole egg and yolk in a bowl and with a pastry brush, lightly coat the braid. I scattered my braids with hazelnut brittle and coarse sugar.
Proofing and Baking
Spray or brush cooking oil onto a piece of plastic wrap, and place over the braid. Proof at room temperature or, if possible, in a controlled 35 degree C environment for about 2 hours, or until doubled in volume and light to the touch.
Near the end of proofing, preheat oven to 200 degrees C. Position a rack in the center of the oven.
Bake for 10 minutes, then rotate the pan so that the side of the braid previously in the back of the oven is now in the front. Lower the oven temperature to 180 degrees C, and bake about 15-20 minutes more, or until golden brown. Cool and serve the braid either still warm from the oven or at room temperature.
Storing: The cooled braid can be wrapped airtight and stored in the refrigerator for up to 2 days, or freeze for 1 month.
Verdict
 by MeetaK")
Like I said at the very beginning of this post - I love these kind of challenges. The dough was quite easy to make, even though it looks tedious it's not. If you've made puff pastry before you should have no trouble with this. For those who have never made puffy pastry, this dough is a great and simple way to acquaint yourself with the layered type of doughs. We loved the chocolate raspberry filling in this and I was quite surprised how fast both the braids disappeared.
Would I make this again?
Yes, I am actually thinking this might replace the puff pastry in some of the recipes in my kitchen. As I found it a breeze to whip up and always need dough on hand for Soeren's lunch boxes or when he has friends over, this dough will certainly be made in larger batches. As the dough is sweetened and contains flavoring it is not versatile for savory fillings.
What did I learn from this challenge?
I've never made Danish pastry before and was surprised at how easy it was. I liked the fact that it makes a nice easy and quick alternative the puff pastry.
A huge thanks to both Kelly and Ben for the great challenge this month!
All photographs and written content on What's For Lunch, Honey? © 2006-2008 Meeta Khurana unless otherwise indicated. | All rights reserved | Please Ask First
Take a second look at the title of this post. That's right: Cooking School: Hot Cross Buns. The last time I looked, Hot Cross Buns fell under the category of Breads. Now take a look if you are on the right blog!
Yup! You are on What's For Lunch, Honey? and yes you are seeing this correctly. I am indeed presenting you with self baked bread outside of a Daring Baker's challenge, that is. If you have no idea what I am talking about then I presume you are new around these parts and would like to direct you to this post. That was my last challenge and as you can see I fear bread baking.
After reading the many comments and emails I got from that post I was rather amazed. Amazed, because you all seem to think that I was fearless. Well I guess Mighty Meeta's Kryptonite is bread baking.
Like any fearless super hero I decided to grab the proverbial bull by its proverbial horns and take this fear factor head on. I have been collecting a few bread recipes in the past few days and hope to present you with a few more bread varieties on this blog - outside of the DB challenges!
Do you see the Categories section on the sidebar? Well you all know how it works - click on the label and you get a list of all the recipes/articles filed under that particular category. The ones that have a larger font simply means that there are more recipes/articles under that category. Now look at the size of my breads category. It's minute! My aim this year is to make that label grow in font size!
As Easter is just around the corner I decided to start with Hot Cross Buns.
What are Hot Cross Buns?
Hot Cross buns have been a symbol of Good Friday for decades. They are specifically sold in bakeries and supermarkets throughout the Easter season. Each bun has cross piped, either with icing, pastry or glaze, on top to signify the crucifixion.
In England, they were once sold by street vendors who advertised their buns with cries of "Hot Cross Buns! "Hot Cross Buns!"
These street cries became the famous nursery rhyme. Do you remember?
As I went to a British School, I certainly remember singing the rhyme. I would not say the Hot Cross Buns I have had in my life were of the gourmet kind but they were certainly delicious. I loved the smell of the spices and the sweet aroma of the raisins when the buns were cut open and toasted on the toaster.
In Christian history, the buns were traditionally eaten on Good Friday, with the cross depicting the crucifixion of Jesus Christ. Although they have been a Lenten and Good Friday tradition for centuries, Hot Cross Buns were not always associated with Christianity. The origins of the crumb lie in pagan traditions of ancient cultures, with the cross representing the four quarters of the moon. During early missionary efforts, the Christian church adopted the buns and re-interpreted the cross. In 1361, a monk named Father Thomas Rockcliffe began a tradition of giving Hot Cross Buns to the poor of St Albans on Good Friday.
In years that followed, many customs, traditions, superstitions, and claims of healing and protection from evil and were associated with the buns. In the 16th century, Roman Catholicism was banned in England, but the popularity of Hot Cross buns continued. Queen Elizabeth I passed a law banning the consumption of Hot Cross Buns except during festivals such as Easter, Christmas and funerals.
Source:
Wikipedia
The recipe I used must have been as old as Queen Elizabeth I herself, because it was taped in my recipe notebook and looked rather faded and tattered. The handwriting was not mine and I cannot remember for the life of me who gave me the recipe. I normally write the names down of the people who gave me the recipes but I only started doing this for the past 8-9 years! So the recipe is certainly older than that. What attracted me to the recipe was the use of all-spice.
The recipes I found during my comparison research did not have all-spice listed in them. It's a spice I really like, but do not use very often in my kitchen outside of the Christmas baking. I also liked that the buns were piped with a mixture of flour and water and not icing. As far as I remember the British either cut the crosses in the buns or use the flour/water pastry mixture to pipe the crosses - never with icing. The reason behind this is because the buns are made a few days ahead and should be enjoyed toasted with only butter spread thickly on the warm bread. Using icing sugar will only cause it to burn when toasted.
Extra Read: My latest article is out on FoodieView. This week I am Re-thinking Casseroles!
The Monthly Mingle gets fruity this month! My guest host Abby has chosen a spectacular theme for this month - Spring Fruit Sensations. So get out your colorful fruit creations and send them over to Abby.
Deadline: April 7th, 2008
Ingredients
Printable version of recipe here.
14g dry active yeast or 30g fresh yeast
500g white flour for bread, plus more for dusting
3 tablespoons sugar
2 teaspoons ground mixed spices - I used cinnamon, all-spice, nutmeg, cloves and ginger
40g butter
200g raisins
Pastry for the crosses:
30g flour
1/4 teaspoon sugar
For the glaze
1 1/2 tablespoon sugar
1 teaspoon gelatine powder
Method
Prepare a baking sheet by lightly greasing it.
In a small bowl incorporate the yeast, 2 teaspoons flour, 1 teaspoon sugar and 125 ml luke warm water well. Cover with a with a damp cloth and place in warm place for about 10 minutes to activate the yeast. After the 10 minutes your yeast mixture should be frothy and bubbly. If this is not the case this means that your yeast is too old and you will have to proof it again with fresh yeast.
In a larger bowl sift the flour and the spices, then mix in the sugar. Add the butter and knead with your fingertips until it resembles breadcrumbs. Throw in the raisins. Make a well in the middle of the flour and pour in the yeast mixture and 185ml water. Using your hands gently mix in the flour into the yeast mixture. Knead into a smooth dough.
Dust the countertop lightly with some flour then tip out the dough and knead for 5 minutes until the dough is soft and smooth. Dust a large bowl with flour. Shape a ball out of the dough and place into the bowl and cover with a damp cloth. Place in a warm place for 30-40 minutes until the dough has doubled in volume.
Preheat the oven to 200 degrees C.
Tip the dough onto the counter and give it another good kneading. Divide into 12 equal parts, then roll each portion into a ball and place on the greased baking tray. Place each ball of dough so that they are touching each other. Cover the tray with a damp cloth and allow to rest in a warm place for another 20 minutes. They balls of dough will double in volume again.
Pastry for the crosses:
Mix the flour, sugar and 2 1/2 tablespoons water into a thick, smooth paste-like mixture. Fill into a piping bag or a small sandwich bag with a slight cut at one of the corners. Now pipe crosses onto the buns.
Slide the baking tray into the oven and bake for 20 minutes until golden brown.
For the glaze
In the meantime prepare the glaze by mixing the sugar, 1 tablespoon water and the gelatine powder in a small saucepan. Mix until dissolved. On low heat heat the mixture until the mixture is smooth.
When the buns come out of the oven brush the buns while still hot with the glaze.
Allow to cool. The best way to enjoy the buns are cut, toasted and with lots of good butter. Hmmmn! You can serve these for a Easter breakfast or brunch.
Verdict
This is incredible. I think I am getting used to this rising and kneading thing as it is proving to be rather therapeutic. While the dough was doing its first rise I was able to complete a relaxing session of yoga. The kneading helps to take away and frustrations and on the second rise I was able to do my nails. LOL! The buns were simply delicious. They rose perfectly, took on a wonderful golden color and the whole house smelled of spices. We enjoyed these for breakfast on the weekend, lightly toasted on the toaster. Soeren spread honey on his, Tom red current jam and I just had it with butter. I think I will make these every now and then for sure and it does not always have to be Easter! ;-)
As I am quite proud of these little babies, I am sending these to - wait for it - Bread Baking Day! This month's hostess is Susan of Wild Yeast and her theme is focusing on the upcoming Spring seasonal holidays - Easter St. Patrick's Day and so on! I've watched from the sidelines and almost took part in last month's Flatbreads theme but chickened out instead. I hope I can often take part in this event from now on LOL!
To celebrate Easter I have thoughtfully and carefully put together a few menu ideas for you. Hope you enjoy them. I'll be in Dubai with my parents, Tom and Soeren, enjoying the sun and looking for Easter eggs in the sand.
Easter menu "Flavors":
| Starter: | Creamy Ginger Carrot Soup wit Lemon Cream | |
| Entrée: | Honey Teriyaki Salmon with Mange-Tout | |
| Dessert: | Lemon Meringue Pie |
Easter Menu "Non-Vegetarian":
| Starter: | Spinach Soup with Coconut milk and Chicken | |
| Entrée: | Creamy Veal and Mushroom Pie with Potato Crust | |
| Dessert: | Raspberry Chocolate Tiramisu |
Easter Menu "Vegetarian":
| Starter: | | Spinach Salad with Goat Cheese and Avocado |
| Entrée: | | Mustard Eggs with Rice Duo |
| Dessert: | | Raspberry Dream Cream |
When I made these last week, Nandita of Saffron Trail and I were chatting and I showed her the pictures I took of these buns. She instantly wanted one. I told her she'd have to make them herself. Well she did and we decided to post on the same day. Do check out Nandita's version of Eggless Hot Cross Buns.
All photographs and written content on What's For Lunch, Honey? © 2006-2008 Meeta Khurana unless otherwise indicated. | All rights reserved | Please Ask First


